Sunday, December 29, 2013
White Antelope - Finished At Last!
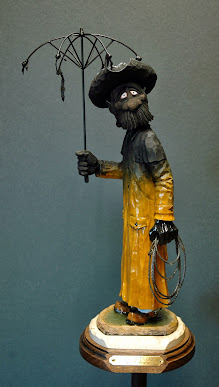
All in all I think it turned out pretty nice. It's certainly an eye catcher. Anyway, I hope you like him and will look forward to your comments as I always do. Lots more photos in the Gallery.
Friday, December 20, 2013
White Antelope
Hope you like it so far. More photos in the Gallery and comments always welcome.
Wednesday, December 11, 2013
The Coal Miner
To make the scenic base which he's standing on I just used some small gravel and glued it down with ModPodge like I normally do. Once dry the entire thing was painted black with a few touches of gray here and there in a few of the open spots. The overall appearance of the piece might seem a little dark but I think it only adds to the figure and the idea we were trying to express.
I hope you enjoyed following along and will look forward to your comments. As always, there are more photos in the Gallery album.
Tuesday, December 03, 2013
Friday, November 22, 2013
Thursday, November 21, 2013
The Coal Miner - Part 29 - Painting The Shirt
Part 28 -Painting The Shirt from Out West Woodcarving Videos on Vimeo.
Tuesday, November 19, 2013
The Coal Miner - Part 27 - Painting The Head
The Coal Miner - Part 27 - Painting the Head from Out West Woodcarving Videos on Vimeo.
Monday, November 18, 2013
Fence Work
While I will continue to stick with the caricature genre you will probably notice that my pieces will take on a more realistic appearance as time goes on. They will also continue to grow in size to what is considered normal for a wooden carved caricature. The larger size allows an increased area for more detail while being much easier on my aging eyes. It also separates my work from that of others which is something I'm always striving for.
There are a few more photos in the gallery and your comments are always appreciated.
Friday, November 15, 2013
Wednesday, October 09, 2013
Circuit Overload
I varnished him about 10 times with gloss, water based Poly and then use Testors Dul-Coat to flatten the upper, burnt part. The puddle he's standing in is just made from a piece of thin plywood and modeled with Bondo. Once painted I mounted him in position, mixed up some clear epoxy resin and carefully filled up the depression, making sure to get the stuff in and around his boots. Once everything was set I mixed up some clear 5 minute epoxy glue and applied it to the lariat to indicate dripping water. Had to set there and constantly reply the drips until it finally set. Really makes a nice effect.
Hope you like him and there are more photos in the gallery. Comments welcome as always.
The Unknown Cowboy
Anyway, I hope you like him so far. A couple more photos in the Gallery.
Oh.......Judy and I hope to crank up the video production department soon as I'd like to get that figure done before we take off to the Dayton show.
Friday, September 27, 2013
Winter's Warmth.....Finished!
I really like the female figure and now that I'm over the hurdle of carving a decent female face I hope to do more of them in the future.
There are quite a few photos in the Gallery and I look forward to receiving your comments.
Thursday, September 19, 2013
Four O'Clock Wake-Up!
I originally had him holding a tin cup instead of the lantern but the hand was just too fragile. Noticing that I had a spare kerosene lantern setting on the window ledge a quick amputation and a little bit of cloning fixed that problem. I would have liked that lantern a little larger but I think it will do. In posting the photos I noticed that I had forgotten to add the watch chain to his vest pocket which has now been corrected. I mounted him using the horseshoe base, something I haven't done in a while. If I go to the larger figures in the future I guess I'm going to have to switch the Clydesdale shoes!!
Anyway, he turned out pretty good and these Chuck Wagon Cooks are always popular so he'll probably be cooking for someone else's spread before to long. I also hope you like him and there are more photos in the Gallery. Comments welcome as always.
Friday, September 13, 2013
The Native American Gains A Girlfriend!
Native American
Friday, September 06, 2013
Grey Owl
I've said it many times before, I love doing Native Americans. There is just so much color and detail one can use to add to the story of a carving. I seem to learn with each new one I complete. With this one I came up with a new way to do feathers that adds a bit of realism without much effort, and I'm always looking for more ways to do things with out much effort these days. I'm going to hang onto this secret for a while but will probably spill the beans later on as I always seem to do. Anyway, I hope you like him and look forward to your comments.
Sarge - Painted
Monday, September 02, 2013
The Coal Miner....Where Is He?
Sarge!
Sunday, August 25, 2013
Bacon Rind
Bacon Rind was an Osage Chief who was friends with Frank Phillips, the founder of Phillips Petroleum and on whose ranch Woolaroc is located. Quite an interesting character.
Anyway, hope you like him and there are more photos in the gallery.
Saturday, August 17, 2013
Friday, August 16, 2013
The Coal Miner - Part 22 - Finally! The Figure Is Finished!
T
Saturday, August 03, 2013
Saturday, July 27, 2013
How To Photograph Your Carvings
It's hard to believe that since posting that video it was followed by 292 more. Total Blog entries are bumping 800 with 791. Hope it's all worth it!
Here's that video:
The Coal Miner - Part 18 - The Left Arm
Things are starting to settle down around here so it's time to get back to the Coal Miner. A funny thing on our trip to Yellowstone....we rented a historic log cabin just outside of Gardiner, Montana that was built back in 1907. Setting inside the living area was a antique coal cart which was just the type I had planned on making as an accessory to this figure. There was an old mine up the hill from the cabin so evidently they just moved it down the slope and into the house. Neat!
Wednesday, July 24, 2013
Snake River Sam
I tried something new to try and give his coat the look of sheepskin with the wool on the inside. It wasn't that hard to do. I just chucked in a Kutzal bit and bumped it across the surface of the wood to rough it up. After that I used a butane torch to burn away all the fuzz. Enough was left to accomplish the thought. It did take a lot of dry brushing to get the correct coloring as that rough surface really soaked up the paint. I like it.
This bust stands a little under 15" with the base. There are more photos in the Gallery and your comments are appreciated as always.
Saturday, June 29, 2013
The Coal Miner - Part 17 - Overalls Continued
Part 17 -Overalls Continued from Out West Woodcarving Videos on Vimeo.
Thursday, June 27, 2013
The Mossback
Sunday, June 23, 2013
Friday, June 21, 2013
The Coal Miner - Part 14 - Finishing Up The Legs
Part 14 -Finishing The Legs from Out West Woodcarving Videos on Vimeo.
Monday, June 17, 2013
The Coal Miner - Part 13 - Roughing Out The Legs
Part 13 -Roughing Out The Legs from Out West Woodcarving Videos on Vimeo.
Black Eagle - Painted
There are more photos in the Gallery and your comments are always welcome.
Wednesday, June 12, 2013
Artistry In Wood Show
Click on the link to the Dayton Woodcarvers website over there on the right for more information. See you there?
Sunday, June 09, 2013
Cotton Eyed Joe II
The Top Hand - Bust
Thanks!
Tuesday, May 28, 2013
Our Mom
Our Mother
------------------
You can only have one mother
Patient kind and true;
No other friend in all the world,
Will be the same to you.
When other friends forsake you,
To mother you will return,
For all her loving kindness,
She asks nothing in return.
As we look upon her picture,
Sweet memories we recall,
Of a face so full of sunshine,
And a smile for one and all.
Sweet Jesus, take this message,
to our dear Mother up above;
Tell her how we miss her,
and give her all our love.
Saturday, May 25, 2013
Just A Note!
Sunday, May 19, 2013
Sour Note Charlie III
More photos in the Gallery and your comments are always welcome.
The Top Hand - Bust
Just the one photo so far. Hope you like him and your comments are always welcome.
Friday, May 17, 2013
The Coal Miner - Part 12 - The Body
I put the pattern for the profile of this guy in the Gallery album.
Tuesday, May 14, 2013
The Coal Miner - Part 11 - Priming the Hat
In this one we prime the hat and look forward to starting the body.
Friday, May 10, 2013
Attachments - Legal or Illegal?
Neat technique.....nobody could ever
To put it bluntly, I couldn't care less about what others might think about what might be considered allowed or not allowed. I look at my efforts as 'sculpture' not necessarily woodcarvings. Wood is just one of the mediums I use. Granted, it might be the main one but it will never be the only one. If I can come up with a way to enhance the look that I'm after that might be made from materials other than wood I'll certainly check it out to see if it will work. As for my entering my pieces into competition I've never had any problems. Quite the contrary, they must be considered acceptable as they've managed to win their share of awards against the stiffest competitors. That makes me feel especially good as the judges recognize that pushing the envelope is not something we should shy away from. Naturally, there are those old mossbacks that continue to profess there is only one, true road that everyone should follow. To those I say "Bunk!" Get the hell out of my way!
Thursday, May 09, 2013
Wednesday, May 08, 2013
Sunday, May 05, 2013
The Coal Miner - Part 6 - The Eyes
Coal Miner - Part 6 - The Eyes from Out West Woodcarving Videos on Vimeo.
Okay....here's an edited HD version.Coal Miner - Part-6-HD Close Up-Mustache & Ear from Out West Woodcarving Videos on Vimeo.
Thursday, May 02, 2013
The Out West Shop Gets A Facelift!
Friday, April 26, 2013
The Coal Miner - Part 4 - More Nose
Coal Miner - Part 4-More Nose from Out West Woodcarving Videos on Vimeo.
Thursday, April 25, 2013
Now Where'd He Go?
Tuesday, April 16, 2013
The Coal Miner - Part 3 - Nose & Mustache
Coal Miner - Part 3-Nose & Mustache from Out West Woodcarving Videos on Vimeo.
Saturday, April 13, 2013
Hard Rock Miner
I had originally painted his shirt the color of chambray but it almost exactly matched the mine tailing he's mounted on. So I changed it to Midnight Blue and dirtied it up with some Raw Umber and a lighter tan. I think I spent more time constructing that little lantern than anything else but it looks pretty sharp.
Hope you like him. I promise we'll be getting back to that fella still stuck in those coal pits. More photos in the gallery and your comments are always welcome.
Wednesday, April 10, 2013
Coal Miner - Part 2 - Changes?
That green looking rock is a piece of mine tailing we picked up last fall which 4wheeling up in the mountains near St. Elmo, CO. If I can locate a piece of coal I'll swap it out. Making the lantern was really fun trying to come up with ways and material to create it. The body was just a piece of dowel whittled to the shape and the front reflector was made with a ball-peen hammer and a piece of cooper, pounding it into a dished shape. The flint striker is just bent wire and the center flame mechanism is wood. The hat bill is TUPELO. Let me repeat that TUPELO! I don't know how I came up with Catalpa last time as I don't have a piece of that wood in my shop.
Anyway, there are a few more photos in the Gallery and I'll try and get things back on track here real soon.
Tuesday, April 09, 2013
The Coal Miner - Part 1 - The Head & Hat
Coal Miner - Part 1 - The Head & Hat from Out West Woodcarving Videos on Vimeo.
Sunday, April 07, 2013
What's Next?
Stay tuned! The fun's about to begin!
Saturday, April 06, 2013
White Eagle - Finished!
Again, to improve his facial coloring I went over the entire area with a wash of a rich brown to give a more bronze look instead of a reddish one. I also added more texture to the feathers. To simulate a fur wrap on his braids I carved, painted with Mod-Podge and then sifted on a layer of the material I use for bases with gives a rough but pleasing appearance similar to fur, especially when highlighted with a little dry brushing. I also lightened up the leather of the robe more than normal. The earrings are made from pounded copper, bent into rings, soldered and then inserted once the piece is completely finished.
There are more photos in the gallery and I look forward to your comments.
Next Video Project?
Monday, April 01, 2013
Who's Up For An Auction?
THE BIDDING STARTS NOW AND WILL END AT 07:00AM CST ON FRIDAY, APRIL 5, 2013!
The winning bid will be the one posted closest to the closing time in the Comment section to this Blog post.
"The Bullfighter" stands approximately 10" tall. I carved it several years ago. While the photo doesn't show it, it does have a brass nameplate. If you look closely you can see a few beads of sweat forming on his forehead so that ugly hunk of beef must have him firmly in his sights and lined up for a direct hit. I't a great piece, lots of humor and color. So........
Good luck and let the fun begin!
Sunday, March 31, 2013
Wednesday, March 27, 2013
"You Ought To See The Other Guy!" - Finished!
I really like painting things like this as it stretches my limited skill each time. Most people would think bruises are purple but they're not. Anyone who's had a shiner or a twisted ankle knows the color variations that show up. I gave him a denim jacket as I hadn't done one in a while. I wish the orange stitching showed up a little better but it's there so at least I tried.
Anyway, more photos in the Gallery and your comments are always welcomed.
Monday, March 25, 2013
You Ought To See The Other Guy!
Friday, March 22, 2013
Wind River Willie
Tuesday, March 19, 2013
Wind River Willie
Sunday, March 17, 2013
The Daily Grind - Part 10 - Wrapping It Up!
I hope you enjoyed this painting adventure and maybe picked up some things you can use. For myself, I learned how to paint a leather-looking vest, something I hadn't done before but will definitely do again. I also tried a new trick with the lantern which I will pass along to you in the future. So, as always happens, if you're willing to experiment and try new things your work always becomes better for it.
Daily Grind - Part 10 - Wrapping it up from Out West Woodcarving Videos on Vimeo.
Saturday, March 16, 2013
The Daily Grind - Part 9 - Gloves & Cuffs
Daily Grind - Part 9 -Gloves & Cuffs from Out West Woodcarving Videos on Vimeo.
Wednesday, March 13, 2013
Painting! What's Up With That?
First, do not think that you can produce good results immediately with a technique you're not that familiar with. I've been painting for over 50 years and I still hit the wall sometimes trying to do something and not having much success with it. Then again, sometimes I do something that totally surprises me at the result. Painting the vest is a good example of that. I had never considered using a tan color for a vest, preferring the darker colors. However, that tan, the darker shading and then the lighter highlights actually take on the look of leather. A new lesson learned!
As for washes over solid paint just remember....once you dip your brush into water and then into paint it's a wash of some kind or other. Some are light while some are heavy but they're all washes. The only difference with my technique is that I wet the surface of the wood so my washes soak into the wood instead of flowing over it and that is a BIG difference. The colors take on the color of the wood which makes them appear much warmer than they would the other way. And I like the way the wood absorbs the color unevenly over the various surfaces of the wood. That just adds another touch to the technique. If there is a spot where I don't want that to happen I can always add more paint to even things out.
I think a lot of problems come from trying to copy something to closely. My suggestion would be to read the book or watch the video a couple of times then put those things away. That's the way THEY paint not the way YOU want to paint. Next, get familiar with what you plan on painting. You can't paint something that you know nothing about. Say you're going to paint Jeans. Go put on that pair of worn out pants hiding in the bottom of the drawer. Now look at all the folds and creases, the worn areas, the holes, the grass or dirt stained areas around the knees. Doing this will show you what you're after and will teach you much more than any photo or video will. The same goes for hats or horses, boots or biscuits, pick it up, feel it, pet it, maybe even taste it. If you know it you can paint it!
And here's the best advice of all.....CHILL! Quit trying so hard. Relax and have fun. No doubt a few of your figures will go sailing across the room to smash against the wall just like mine have on occasion. Accept the fact that it's going to take a long, long time and tons of practice but you will get there eventually. If, for some reason you don't make it, you can at least reflect back on a great adventure and the satisfaction of trying and giving it your best shot!
Oh...I forgot the second most important thing after practice...Confidence! But, fortunately for all of us, this will appear all by itself the more we grow confortable with what we're doing through practice. I haven't ridden a bicycle in half a century but I KNOW, having done it once pretty good, I can do it again. Painting or carving works the same way. The more we do it the more comfortable we become and confident that we can do it again.
The Daily Grind - Part 8 - Painting The Vest
Part 8 - The Vest from Out West Woodcarving Videos on Vimeo.
Tuesday, March 12, 2013
The Daily Grind - Part 7 - The Shirt
Daily Grind - Part 7 - Painting the Shirt from Out West Woodcarving Videos on Vimeo.
Sunday, March 10, 2013
The Daily Grind - Part 6 - Finishing up the Chaps & Belts
Daily Grind - Part 6 - Finishing the Chaps & Gun Belt from Out West Woodcarving Videos on Vimeo.
Friday, March 08, 2013
The Daily Grind - Part 5 - The Chaps
Daily Grind - Part 5 - The Chaps from Out West Woodcarving Videos on Vimeo.
Thursday, March 07, 2013
Daily Grind - Part 4 - Hat, Holster & Gun
OOPS! I just noticed that I dropped a segment at the end of the Hat where I paint the hatband and do some dry brushing with white to finished it up. Too late now! We've covered that before so if you need to you can review some of the earlier posts. Sorry!
Here's the HD version:
Daily Grind - Part 4 - Hat, Holster & Gun - HD from Out West Woodcarving Videos on Vimeo.
And here is the MP4.
Daily Grind - Part 4 - Hat, Holster & Gun - MP4 from Out West Woodcarving Videos on Vimeo.
Looking forward to your comments as always.
Wednesday, March 06, 2013
The Daily Grind - Part 3 - Boots, Jeans & A Coffee Pot
In this one we paint the boots, jeans and the coffee pot.
Daily Grind - Part 3 - Boots, Jeans, Coffee Pot from Out West Woodcarving Videos on Vimeo.
Saturday, March 02, 2013
The Daily Grind - Part 2 - Painting The Head
Daily Grind - Painting the Head from Out West Woodcarving Videos on Vimeo.
Friday, March 01, 2013
The Daily Grind - Part 1
He's a large one....standing about 18-20 inches with the base. The lantern will probably be changed in the final configuration as I was able to get some hollow plexiglas tubing which will allow me to create an actual flame within the lamp globe. Now all I have to do is to figure out how to do it. But that's half the fun of creating these things.
Just one more photo in the Gallery and your comments are always welcome.
When The Boss Ain't Happy, Ain't Nobody Happy!
There are a lot more photos in the Gallery which Google has changed again, so I hope you will not have trouble checking them out. As always, your comments are welcome and appreciated.
Friday, February 22, 2013
Out West - Up In A Cloud!
Thursday, February 21, 2013
Red Antelope - Finished!
Hope you like him and also hope you like the new Blog layout. More photos in the Gallery and your comments are always welcome.
Tuesday, February 19, 2013
Red Antelope - The Final Touches
Thursday, February 14, 2013
Don Quixote - Finished At Last
I hope you enjoyed this series. I know it was a long one but sometimes that's what it takes to create some special as this one certainly is. There are more photos in the Gallery and I look forward to your comments.
Don Quixote - Part 22 -- FINISHED!!!
Don Quixote - Part 22 from Out West Woodcarving Videos on Vimeo.
Tuesday, February 12, 2013
Don Quixote - Part 21
Don Quixote - Part 21 from Out West Woodcarving Videos on Vimeo.
Sunday, February 10, 2013
Osage County Cowboy - Painted
Red Antelope
Saturday, February 09, 2013
Don Quixote - Part 20
Don Quixote - Part 20 from Out West Woodcarving Videos on Vimeo.
Friday, February 08, 2013
Don Quixote - Part 19
Don Quixote - Part 19 from Out West Woodcarving Videos on Vimeo.
Tuesday, February 05, 2013
Don Quixote - Part 18
Don Quixote - Part 18 from Out West Woodcarving Videos on Vimeo.
Thursday, January 31, 2013
Don Quixote in the Raw
The Texican - "You Called Me A What?"
Wednesday, January 30, 2013
Don Quixote - Part 17
Don Quixote - Part 17 from Out West Woodcarving Videos on Vimeo.
Tuesday, January 29, 2013
The Texican-First Look!
Anyway, hope to get this guy painted today and looking forward to fleshing him out with "All Things Texan"! And I know what he got that medal for and it ain't purdy!
Hope you like him and there are a couple more photos in the Gallery.
P.S. Also, if you want to offer honest opinions and post your carving photos without worry about them being pulled because someone might think they're Racist you're invited to join the Out West Possee Face Book page. The link is up there on the right.
Just remember....it is NOT a gun free zone so watch what you say!
Thursday, January 24, 2013
Woolaroc Museum Receives The Carvings
There are quite a few other photos in the Gallery and I apologize for the movement in some of them.....no doubt caused by the amount of nervousness on Judy's and my part. So, if someday you happen to be heading down US60 west out of Bartlesville, OK, make a left turn onto Oklahoma 123 and drive southwest a few miles to see about 5 years of my life.
Tuesday, January 22, 2013
Don Quixote - Part 16
Don Quixote - Part 16 from Out West Woodcarving Videos on Vimeo.
Monday, January 21, 2013
Don Quixote - Part-15
Don Quixote - Part 15 from Out West Woodcarving Videos on Vimeo.
Sunday, January 20, 2013
Black Buffalo - Finished!
The trickiest part of this one was the necklace. I had originally though about prepainting everything before assembly but then thought, being as the teeth, the robe and the necklace fur are all pretty much the same color I'd just paint them once it was together. To set the claws, once the fur was textured I cut the slots for each claw which was numbered along with the slot. When setting them I started with a back claw, working my way forward and around, drilling a small hole in each one for the wire which holds the beads. Had to do it this way so the wire would match without any kinks. Once the epoxy was dry I strung the beads which are held on the wire with superglue. Then it was off to the paint table.
For the drops off the headress, the ermine tails were carved, doweled and inserted into place, the ribbons were made from Tupelo which was first, boiled, twisted into place, and then clamped until dry. After that they were removed and painted and then doweled and glued in place.
The war club was in two pieces with leather decoration on one end and a pounded brass point on the other. The decorative nail head are just paint dots. The cloth trailer on the back of the headress is another piece of Tupelo with added wooden buttons. I put a drop of epoxy on the top of the painted nail heads which gives the appearance of beads. The base is walnut.
This was a great project resulting in, what I think is a great piece which I'll probably hang onto for a bit. It will look good setting next to the Warbonnet bust.
Lots of photos in the Gallery and your comments are always appreciated.