

Showing posts with label Shield. Show all posts
Showing posts with label Shield. Show all posts
Saturday, June 15, 2019
Running Horse


Thursday, May 31, 2018
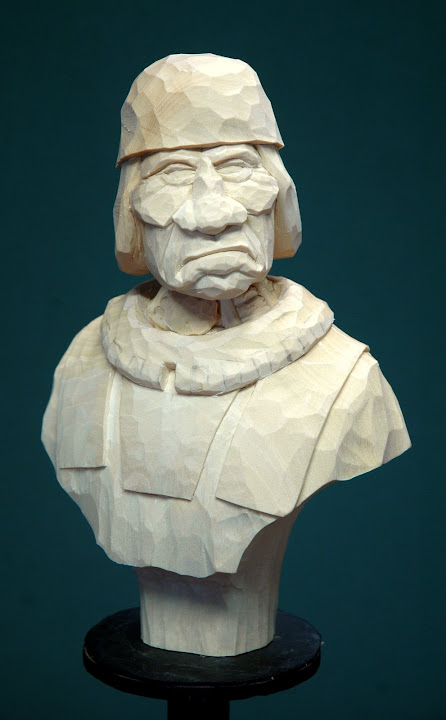
Long Robe - Native American Bust With Shield - Finished

Comments welcome.
Saturday, January 14, 2017
Spotted Elk - Finished

Spotted Elk turned out to be a really nice piece. With the walnut base he stands just over "14 inches so he will certainly command his own space when displayed. A friend sent me a photo of the war-shirt beading design which I'm always on the lookout for. The only real difficulty in doing it was the thin stripe on each edge. To do that I waited until the painting was sealed and then taped it off. Worked out great. The lance was made from a piece of carved dowel with a pounded metal point tired in place with a wrap. I also wrapped heavy cord around the fur areas on the shaft and then covered that with texturing material. I really like the result as it looks just like course fur when painted. The shield design is from a photo I took of one at the Prairie Edge store in Rapid City (http://prairieedge.com/) last summer. The earrings are made from pounded aluminum flashing with a copper wire loop to hold them to the ear.
So, now it's on to the next project, and like I said, it's a BIG one. As always, your comments are welcome and appreciated. More photos in the Gallery.
Thursday, December 08, 2016
Spotted Elk

This one also stands around 12" tall with the walnut base and as most of my Indians should be pretty colorful once painted. I really like doing these busts, especially with the addition of the shields and other attachments. The sky is the limit with how they can be painted and the result is always striking.
Again, I look forward to your comments.
Thursday, July 14, 2016
Wandering Bull - Part 3

So, I hope you like it and will look forward to your comments.
Sunday, May 15, 2016
Seasons Past - Finished

There are more photos in the Gallery and I will look forward to your comments as I always do.
Saturday, May 14, 2016
Native American Shield

Thursday, May 12, 2016
Seasons Past

Hope you like him.
Friday, January 29, 2016
Touch the Stars

The shield design is partially from one I found while researching on the web but I modified it quite a bit from the original. Instead of domed tacks, this time I use some very small brass bells. Such things were actual trade items Native Americans sought for decoration.
There are more photos in the Gallery and I will look forward to your comments as I always do.
Wednesday, January 20, 2016
Many Horses

With that shield and the hanging feathers this piece stands a little over "14 inches with the base. Nice! I've mentioned before that working in a larger scale not only gives you the chance to concentrate on details but it elevates your work to a higher level.
As I seem to be moving toward the more realistic figure, one area needs to be addressed and that is the eyes. On this figure I think they are a little large which is why I decided to do the facial painting as a solid black strip to reduce their appearance. That pretty well corrected their size. Yesterday afternoon I worked on a new head, reducing the size of the eyes and it really changed the whole appearance of the piece which was exactly what I was looking for.
The beading design is my own and the feathers hanging from the shield are based on those of a Red Tailed Hawk. The head feathers are large and out of scale but they balance the piece...the off-set shield pulls the eye one way but the feathers pull them back to the center. The base is walnut and I'm trying a new routed edge to accommodate the name plate.
There are more photos in the Gallery and I'll look forward to your comments.
Friday, July 03, 2015
The Plains Warrior

There is one thing that I was going to do but at the moment thought better of it. The leggins are kind of plain. I could have ran beaded strips down each leg but I think that would have been just too much. I also could have painted on black stripes on each leg to indicate counted coups but I think that too would be just too much. Seeing it now I think I made the right decision.
I added some horse hair decorations to the ends of the bow and arrow cases and the tomahawk handle. As they swing freely they add a little motion to a static figure. I used low doamed brass tacks for the decoration on the belt and added a leather strap to the shield. With the base the figure measures right at 21". An impressive carving.
Wrapping things up I think this turned out to be an example of my best work and the collector who has spoken for it will have a really nice piece to add to his growing collection. I know it will have a good home and lots of old friends. Hopefully, they'll get along with each other.
Lots of photos in the Gallery and I'll look forward to your comments as I always do.
Sunday, February 22, 2015
Red Hawk
.JPG)
I've done a few similar busts of Native Americans similar to this one but this time I tried a different style of base to elevate it to a higher level and make it a little more impressive......at least I think it does. The base is walnut. I had thought about attaching some scalp locks to the shoulders but after trying out a couple decided against it. With all the decoration it already has that addition might have just be a little too much. I really like the shield, a design I came across while researching war gear. I modified it some to keep it from being a direct copy. There are a lot of different colors in the shields painting but you have to look at it close to see them...blues, blacks, reds, yellows, all blended to make it interesting. It's anchored to the base and the figure by metal studs. The tip of the spear is made from hammered copper and anchored in place with some flax material used for leather binding that looks just like rawhide.
So, I hope you like Red Hawk. It's a nice piece that should move off the reservation fairly quick....at least I hope it does.
More photos in the Gallery and I look forward to your comments as always.
Saturday, May 12, 2012
Red Horse

-
As I've mentioned before, I really love doing this type of carving as it's a challenge to see how much detail you can add. Also, as they are so colorful and unique they sell immediately. I've seen a lot of painted bronzes but they seem cold compared to these wooden fellas.
-
Anyway, hope you like him so far. As you can probably tell I've been alternating from Cowboy to Indian and back to Cowboy. Going to have to break off of that track soon and do some horses and especially a Sheepherder.
-
As always your comments are welcome and appreciated.
Friday, December 02, 2011
Wall Drug Cowboy Band

-
They stand about 6 inches tall. I've included back and side views photos of them in the Gallery along with a close up of the faces. Maybe you'd like to try your hand at making a set of your own.
Monday, September 12, 2011
The Dog Soldier

-
I'm not really sure just how many feathers are in his headdress...at least 150. I had originally placed about 130 and then noted a couple spaces hat could use some extras. Of course everything was already glued in place and as those feathers are longer than the drill I had to make an extended drill to get into the narrow spaces. I did this by using some brass brazing rod I had on hand. I think it was about 1/16". When inserting and anchoring them in place I was worried that regular carpenters glue would dry visible so I went to Lowes to get some of that dark carpenters glue. Evidently they don't make it anymore but I did find a new transparent wood glue that, after running a little test found that it dried completely clear and seemed just as strong as the other. I just might permanently switch to that type for everything.
-
One thing I think will be necessary for this piece is a display case. I had hoped to find a glass globe that would work but they were either to short or too tall but I did find a Plexiglas cube that should work so will go with that. Even with that I'll have to come up with some way to anchor it inside the cube to keep it from sliding should the cube get bumped.
-
This has been a very satisfying project and one that should really be a hit in Dayton, at least I hope so. There are more photos in the Gallery and as always, your comments are welcome and appreciated.
Friday, September 09, 2011
Cheyenne Dog Soldier - First Feathers In Place

-
More photos in the Gallery.
Wednesday, September 07, 2011
A Couple of Carving Meeting Results.


Cheyenne Dog Soldier - Just A Few More Details

-
The tip of the lance is pounded copper with gives it the appearance of a flint spear point. I will add some feathers to the top and bottom areas and also do some feather and hair decoration on the shield. Not really sure if that shield design is one a Dog Soldier would use but I like it and once the detail is added it ought to look real snazzy.
-
So, after I finish my baloney sandwich it's back to the shop to pluck some feathers! More photos in the gallery.
Sunday, September 04, 2011
Cheyenne Dog Soldier - Almost Done

Cheyenne Dog Soldier -Roughing It!
Subscribe to:
Posts (Atom)