Showing posts with label Rope. Show all posts

Sunday, May 31, 2009

The Brush Popper


If you're wondering what a Brush Popper is it's a wrangler who works cattle in areas with a lot of low, scrub brush. Here's how Rooster Cogburn put it in the movie True Grit:
-
"Rooster pulled his cedar-handled revolver and cocked it with his thumb and threw down on LaBoeuf. He said, "It will be the biggest mistake you ever made, you Texas brush popper."
-
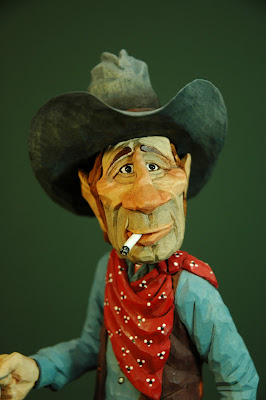
Evidently he didn't think much of Brush poppers...especially those from Texas. The brush popper theme is also amplified by the bodacious amount of "brush" growing beneath his nose. I did this piece quite some time ago as the rope he's holding is made from nylon string vs. the wire method I use now. I really like the colors especially the calfskin vest. T
-
There are a couple more photos in the Scanned Photos album. Comments welcome as always.

Thursday, March 19, 2009

Tea Time- 2

Old Crusty got his makeup on yesterday so he's all ready for his trip to Kansas City cause he's heard that "everything is up to date"* there and he's a guy who want to be au courant with whats happening! Hopefully, he'll do some networking and get hired on at another spread. One thing for sure....with that "Equalizer" strapped on to his leg any ribbing about his choice of cup contents has suddenly came to a complete halt.
-
This was a pretty quick project and the kind I think I'll do more of. Big involved scenes are challenging but they don't sell very well. There's not too many collectors out there who can devote a complete table or desktop to a piece but they can find room to display a single figure.
-
Anyway, I hope you like him and look forward to your comments. More photos in the gallery.
-
(*Apologies to Rogers & Hammerstein!)

Extra Note: Under the Gallery link I've posted a link to my Facebook page. There's not much carving going on there just my frequent postings of jokes, cartoons, photos and other stuff. Also, as it seems the older I get the more conservative I become so those who lean more to the liberal side might not enjoy the visit. Living out here in the boondocks I'm always on the lookout for new "friends" and Facebook seems to be a means to hook up with some.

Sunday, March 15, 2009

Stretching His Rope - Part 5 - Finished!!!


Yipee!!! Hooray!!!! Whoop-di-do!!! I finally finished this project!!!!!!!!! I guess you can tell that I'm happy to get him off my work and paint tables and into the Gallery. Just in time for the Kansas City Show. And, if I don't sell him there, I'm thinking of putting him up for auction.
-
I've covered painting before so let me explain how I did the rope. I went to Lowes and bought a coil of pre-twisted galvanized wire which uses 4 strands of, I think, 20 gauge wire. I cut a length of it to match about 30 feet in scale with the figure as that's how long a lasso would be...about 36 inches. I removed two of the wires and chucked one end into my drill and the other clamped in a vise. Running the drill in reverse as forward would untwist it, I ran the drill until it looked like rope. Next I coiled it around a 2 inch cylinder and then dropped it into a plastic cup filled with enough gun bluing to cover. Once it darked up I removed it and set it aside to dry completely. Once dry a lot of the oxidation comes off on your fingers so to stop this from happening I give it a spray with Deft to anchor it down cause I don't want it to dirty up my carving while I'm threading it through the hands. To complete this step I bend and tie a honda on one end using some thread and a drop of superglue.
-
Now comes the fun part.....Before proceeding stop and figure out just how that rope would go through his hands. The best way to do this is to get a length of rope, make a loop and assume the pose you want. Ask for help from the wife or someone for this step cause the last thing you want to do is to thread that rope only to find that you did it wrong. Those hands are fragile!!
-
Now, assuming your Cowboy is right-handed insert the rope into the hand so the honda hangs out the front. Loop the rope around, up through the honda and back into and through the hand. Then its over his leg and into the hand from the front continuing to make the loops until all your rope is used. You can click on the photo above to get a real closeup of how I coiled his rope. Now that rope is going to be pretty springy so you're going to have to be very careful bending it as you go. Once you get it just like you want it use a few clothes pins to hold it all together while you mix up a little epoxy to hold all those loops together and in position. Don't worry about the right hand, that loop will hold without any glue.
-
Now it's time for some paint. Using a color called Mudstone lightly dry-brush the rope until you get the color coverage you want. Ideally you want the dark crevices to remain dark with just the top of the rope colored. I get some paint on my brush then brush most of it off on a piece of paper before applying it to the rope. Takes a few times to get everything covered but it's not that hard to do if you take your time.
-
Now you can anchor him in place on his base and check for final touch-ups and your through. I'll bet you will fill just like I did....Thank God that's over!!!
-
More photos in the Gallery and comments welcome as usual.


Wednesday, February 18, 2009

Stretching His Rope - The Head, The Hat and the Carving Part Is Over!

Hooray!!!! I finish the carving part and I must say he's looking pretty good. I'm even thinking about maybe running a little Auction again. Anybody Interested?
-
There are loads of photos in the associated Picasa gallery and I've explained the whole process as what I wrote in past tutorials was lost due to the old gallery problems.
-
So, the only thing left now is the paint job which I'll try to do in the next couple of days. I doubt if I go into a lot of detail with that part as most of you know how I do that already.
-
Again, loads of photos and comments are always welcome.

Monday, February 16, 2009

Stretching His Rope - Part 4 - Attaching the Arms

Well, what do you know....I finally got around to working on this project again. There has been a lot of interest lately on the WCI site about how to attach arms so I thought it was a good time to show how I go about it and hopefully finish this carving. This is the first tutorial utilizing the Picasa albums format and I think it will work out great as it lets you see a much larger photo along with the description.
-
I'll try and carve the head tomorrow at our local carving group meeting. Would like to get him finished before the Kansas City show on March 20th & 21st. There are lots of photos in the Picasa gallery along with descriptions of how I went about it. As always comments are welcome as are any questions.

Saturday, December 13, 2008

Stretching His Rope-Part 3

I was finally able to get back into the shop today so I finished the base and the main part of the figures body.
-
Before mounting the body I suggest you do a little experiment in front of a mirror, standing in a similar manner as this figure. If you look closely you'll note that you lean in the direction of the supporting leg. If you try to straighten that leg up you'll lose your balance. Remember this little detail when you mount the figure. If you look at the photo you can see I placed him just a little off-center. Don't want him to fall off the bookshelf!
-
In the photos I also suggest a good reference book: Cowboys & The Trappings Of The Old West. I use that book on a constant basis to find new ways to do things. Naturally, there are others out there but this is one of the best.
-
In the next part we'll do the arms. Lots of photos in the Gallery.

Saturday, December 06, 2008

Stretching His Rope-Part 2

To the left is the template I used to make the base for this project. I used a piece of 1" Oak for the larger base, a piece of 1/2" Basswood for the second level and finally a piece of 1/8" panel for the top. The wide area between the Oak and Basswood pieces is large enough for a nice routed edge incorporating an attached Brass nameplate. It's little details like these that make your carvings really look sharp. If you want to use a nameplate you can find one online at www.signsbygwynn.com. I used their A-30 size brass plate for this one. The title of the piece will be in Double-line Block and my name in Script. You can just fill out the order on line or give them a call. They'll get it to you cheaper and a lot quicker than you can get it locally. Tell them I sent you.
-
The attached photos show the whole process of making the base and locking in the wheel. In the next part we'll start working on the figure.
-
Good luck! Lots of photos in the Gallery.


Thursday, December 04, 2008

Stretching His Rope

The wheel is finished so now we start the figure. The drawing to the left has all the pieces along with the measurement of the body which will give you the sizes of the other parts. As his arms will be stretched while to make his loop we'll attach them. But don't worry about that now we're only concentrating on the body blank.
-
You'll note that the wheel he's leaning against is tilted back a bit. I did this to give a more pleasing appearance to the piece. Having it stand straight up would make the whole piece look stiff. Also, as how he comes into contact with the wheel is very important we will do the base before we actually carve the body. This might sound kind of odd but you'll see the logic as we move along.
-
So, let's get started! Lots of photos in the Gallery.