

Monday, December 19, 2011
Merry Christmas & Happy New Year
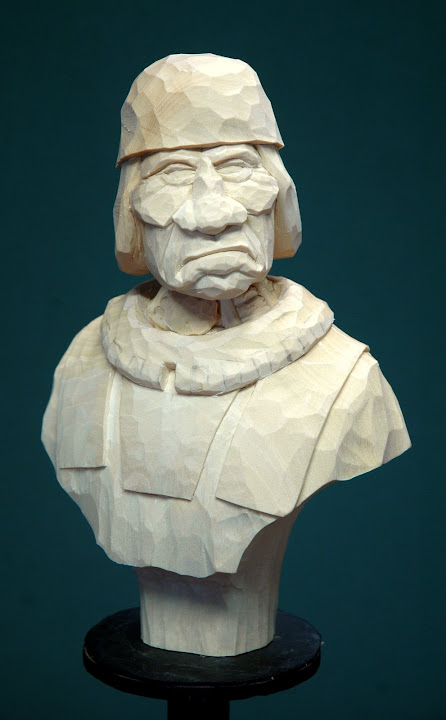
Fireman – Part 6
With this video we map out the lower body. I’ve decided to go with a 3/4 bust which will give us lots of opportunity for detail and once completed will result in an impressive piece of sculpture.
I’ll give you the measurements of the body in the video but as part of this exercise it will be up to you to come up with your own pattern as that is part of the overall process of developing a character.
Thursday, December 15, 2011
Tuesday, December 13, 2011
Fireman – Part 4
With this segment we finish carving the head and take a look as what’s ahead with the helmet. And I don’t care what some might say I’ll bet anything that there is a Fireman out there somewhere that puffs on a stogy while hosing down a flaming building!
Friday, December 09, 2011
Fireman – Part 3
With the Kerosene Lantern project wrapped up we’re back to the Fireman and roughing out the head.
Making A Kerosene Lantern – Part 4

We wrap up this little project with this video and I’ll be the first to say that the little lantern we constructed looks pretty snazzy. Hopefully, you’ll try and make your own version cause a little extra detail like this can really spark up your carvings.
Thursday, December 08, 2011
Making A Kerosene Lantern – Part 3
This video wraps up the assembly. Only thing left now is the paint. I’ve got to admit that this is one nifty looking little lantern.
Wednesday, December 07, 2011
Making A Kerosene Lantern - Part 1

I’ve received a number of requests to show how to create a Kerosene Lantern but have been hesitant to do so as most probably don’t have a wood lathe or access to one. So, after a little experimentation I think I may have found a way that anyone with a band saw could turn out a lantern that might not be to scale but still looks pretty good. It’s not a hard thing to do but does involve a number of steps and the tracking down of Plexiglas rod. I get mine from a Plastics distributor in Tulsa that caters to sign shops. If you live close to a large city you can probably find a listing in the Yellow Pages. If not you can order it from a source on the net.
-
Tuesday, December 06, 2011
Monday, December 05, 2011
Fireman – Part 1

I want to thank you for all the really neat ideas and suggestions for the next video series. I think I’ve got one that you’ll approve of and that will make one of the niftiest carvings we’ve done yet. We’re going to do a bust of a Fireman.
-
My good friend Stan Hope up in South Dakota sent me a suggestion and a whole load of reference material on Fireman, both antique and modern. This project will incorporate details from several different time periods. I’ll use some details and equipment that might not exactly match up to the correct period but it will make a neat figure.
-
Here the link to the material Stan has allowed us to use:
-https://picasaweb.google.com/dakotahope/LynnFFReferencePics#
There is enough here that will allow you to use something different if you want. It’s all good and we owe our thanks to Stan for putting it all together.
-
So let’s get started!
Friday, December 02, 2011
Wall Drug Cowboy Band

-
They stand about 6 inches tall. I've included back and side views photos of them in the Gallery along with a close up of the faces. Maybe you'd like to try your hand at making a set of your own.
Tuesday, November 29, 2011
Lizzie Bear Foot - Finished

-
Still trying to come up with a new video project that will appeal to a wider audience maybe than just Cowboys & Indians. Don't mind drifting off those subjects once in a while but don't like to stray too far. Have gotten lots of requests for a Cowboy Santa but that subject has been way to overdone already. Any suggestion?
-
Anyway, hope you like the lady and there are more photos in the Gallery.
Wednesday, November 16, 2011
Lizzie Bear Foot
As I mentioned earlier, while in Dayton I hoped to set down with Jim Willis to get some instruction on creating fur. Here's a short video I made while Jim did all the work. Sorry about all the noise in the background but the show was a big one with lots of people. Also, take a moment to visit Jim's website to see some excellent work. He’s one of the best! Here's that link: www.wildlife-woodcarver.com.
Tuesday, November 15, 2011
The Dayton Artistry In Wood Show

-
We had a great show this year as did most who attended. According to the hosts attendance was close to 3000 the first day and while it was down on Sunday it was still pretty crowded in there. I managed to win a few ribbons and sell a few carvings but that little piece of wood I'm holding over there made the whole trip worthwhile.
Monday, November 07, 2011
Lizzie Bear Foot

-
This piece is a little more realistic than my normal caricatures as I wanted to see what my normal carving techniques would look like when applied to that type of figure. I think she looks pretty good. When finished she will have an Elks tooth decorated dress along with the beaded strips which haven't been burned yet. She stands about 17 to 18 inches to the tip of her feather. Will also be quite a bit of painting and detail work on her so she should be a pretty striking figure.
-
There are a few more photos in the Gallery and your comments are welcome as always.
Wednesday, November 02, 2011
A Cowboy Pony

-
Hope you like him and your comments are appreciated. More photos in the Gallery.
Muy Caliente - Photos

The photos are in the gallery and your comments are always appreciated.
Thursday, October 27, 2011
Running Buffalo

-
Looking forward to the OKC show in hopes that there will be a wildlife carver there who can give me some tips on duplicating fur a little better than I did here. While it looks okay I'm sure it could look better.
-
Anyway, hope you like him and there are more photos in the Gallery.
Sunday, October 23, 2011
Muy Caliente - Wrapping Him Up!
Well, believe it or not, after almost 10 hours of videos we’ve come to the end of this project. It certainly has been a challenging one at times but always fun and I think we ended up with a pretty clever and unique character which is what we always want and strive for. I hope you enjoyed the trip and possibly even picked up a tip or two. I know I learned a few things. I’ll put some photos in the Gallery once the nameplate shows up and as always, we appreciate your comments.
-
Oh, I forgot one thing! I have a right arm and a plate with chili, tamales and a couple of hot peppers left over. So, as I don't have any plans on using them I'll give them free of charge to the first person to submit a comment on this post. Maybe you can use them on your figure or use them as a guide. Whatever, just drop me a comment and they're yours.
Friday, October 21, 2011
Thursday, October 20, 2011
Muy Caliente - Part 21
We’re almost finished with the painting. The only thing left now is to cook up some chili which we’ll do in the next one.
Wednesday, October 19, 2011
Muy Caliente - Part 20
Hey!! We’re back on track. The vest is fixed and the paint is flowing again. Aside from a momentary interruption by the “Fickle Finger of Fate” we’re once again on the downhill stretch. At least till the next goof!
Tuesday, October 18, 2011
Muy Caliente - Part 19
MAJOR SCREW-UP! Judy was kind enough to point out a major mistake on this figure. Thanks a lot Honey! No really! Thanks for catching this now before it was too late. I’ve made lots of mistakes before but not one of this magnitude, at least not on video. But, as I said when first posting these videos, any mistakes I make will be shown because just like most I too make some pretty good goofs and this is certainly one of those. So, in the next one we’ll see if I can dig myself out.
Monday, October 17, 2011
Cotton-Eyed Joe

-
I lifted the neckerchief idea from a small bust of Festus I came across a while back. I really liked the way it was draped across the shoulders instead of just hanging straight on the chest.
-
Anyway, I hope you like him and look forward to your comments. More photos in the Gallery.
Friday, October 14, 2011
Tuesday, October 11, 2011
Monday, October 10, 2011
Muy Caliente - Part 16
With this video we start to add some color to our Mexican. I’ll only concentrate on the face as that seems to be what is most requested.
The Top Hand

-
Hope you like him. There are more photos in the Gallery and your comments are always welcome.
Wednesday, September 28, 2011
Muy Caliente! - Part 15
Now for some burning. I’d didn’t do the whole figure but did hit all the areas so you can get an idea of how I go about it. In the next segment we’ll start painting.
Tuesday, September 27, 2011
Muy Caliente! - Part 14
At last! With this one we finally wrap up the carving part of this project. I don’t know about you but I sure am glad this part is behind me. Next up is the painting and that will be fun to do.
Monday, September 26, 2011
Muy Caliente! - Part 13
With this one we start the second try on the left arm and hand…this time holding a plate. I think you will find this one quite easy to do compared to that mountain we had to climb with the bowl. Hopefully, please God, Part 14 will be the end of the carving part of this series and we can start painting which I’m really looking forward to. I’m going to try and have some fun filling that plate with some south-of-the-border cuisine of the hot variety. See there…..not only are you hopefully picking up some carving tips but soon we’re going to be running competition with the Cooking Channel!!! Ay Carumba!
Graduation Day? I'd Say So!

-
Nice work Glenn!

Sunday, September 25, 2011
Muy Caliente! - Part 12
ROADBLOCK!!! Yep, we hit one. As occasionally and sometimes always seems to happen when doing something from scratch you hit the wall. This happened as I was carving the hand holding the bowl. While I made it through the problem it took me about 3 hours to do it and could have been a complete video series on it’s own. Well, I don’t want you to face this problem if I can help it so I will look for a different and easier way to accomplish this part of the project with basically the the same result.
Thursday, September 22, 2011
Muy Caliente! - Part 11
Forgot……I had one more. This will take care of the right arm. Now that was one mountain to climb but we made it will a lot of adjustments not to mention a dose of profanity! At least the fella didn’t go sailing across the shop as some have! Anway, we’ll start the left arm in the next one.
Wednesday, September 21, 2011
UP & AT EM!

-
Hope you like him and there are more photos in the Gallery.
Tuesday, September 20, 2011
Muy Caliente - Part 6
Here’s Part 6……we’re really moving along now. Hopefully Part 7 will be up this evening.
Monday, September 19, 2011
Muy Caliente! - Part 5
Here’s part five. We start the main body so some heavy carving is ahead for us. Have fun!
Saturday, September 17, 2011
Muy Caliente! - Part 4
We wrap up the head with this segment and I get a little preachy about my pupils! Not you folks but about the way some paint their eyes. If you’ve watched a lot of these videos you probably know by now that I have definite opinions about certain things. Anyway, now I have make the hat and start figuring out the type of body we’re going to stick this head on.
Thursday, September 15, 2011
Muy Caliente! – Part 3
The addition of that piece of wood was a great success so now I can look forward to the next problem. It’s things like this that add a little spice to your day. The head is well on it’s way and we should be able to finish it up in the next segment.
-
Oh, before you ask……No! I wasn’t in the Air Force. Our youngest son was though and retired a couple years ago. It was the US Army for me as it was for our oldest boy.
Wednesday, September 14, 2011
Muy Caliente! - Part 2
Well……Judy read me the riot act after filming this one. Seems I was jerking that head around so much she was having a hard time following it. I apologize and promise I will try to keep it in the frame but a guy has to see what he’s doing don’t he?
-
First, a special note! You might want to wait till Part 3 is up before starting to whittle along with me on this one. I was not satisfied with the cheek bump so I performed a little facial surgery to increase the material to allow for a larger bulge. I’ll explain what I did in the next video. . If it works great! If it doesn’t I’ll be back to square one.
-
One thing I noted when watching the video is that some might find it a little boring as I take off a chip or two then stop for a look then take off another chip or two then take another look and then continue on. Well, that’s the creative process at work and I’m not going to edit it out as I think it’s important to see the entire process from the smallest chip to the larger one.
-
Monday, September 12, 2011
Muy Caliente! - Part 1
Quite a few of you have been asking when the next video series will start. Well, here's the first part of one that should be a lot of fun. I explain what I hope to do with this one in the video so I won't repeat that here. Some of you will recognize certain parts of the upcoming figure but we'll put these parts together a different way to make this carving as unique as those others were. So, go get a good piece of basswood and a sharp knife and let's have some fun.
The Dog Soldier

-
I'm not really sure just how many feathers are in his headdress...at least 150. I had originally placed about 130 and then noted a couple spaces hat could use some extras. Of course everything was already glued in place and as those feathers are longer than the drill I had to make an extended drill to get into the narrow spaces. I did this by using some brass brazing rod I had on hand. I think it was about 1/16". When inserting and anchoring them in place I was worried that regular carpenters glue would dry visible so I went to Lowes to get some of that dark carpenters glue. Evidently they don't make it anymore but I did find a new transparent wood glue that, after running a little test found that it dried completely clear and seemed just as strong as the other. I just might permanently switch to that type for everything.
-
One thing I think will be necessary for this piece is a display case. I had hoped to find a glass globe that would work but they were either to short or too tall but I did find a Plexiglas cube that should work so will go with that. Even with that I'll have to come up with some way to anchor it inside the cube to keep it from sliding should the cube get bumped.
-
This has been a very satisfying project and one that should really be a hit in Dayton, at least I hope so. There are more photos in the Gallery and as always, your comments are welcome and appreciated.
Friday, September 09, 2011
Cheyenne Dog Soldier - First Feathers In Place

-
More photos in the Gallery.
Wednesday, September 07, 2011
A Couple of Carving Meeting Results.


Cheyenne Dog Soldier - Just A Few More Details

-
The tip of the lance is pounded copper with gives it the appearance of a flint spear point. I will add some feathers to the top and bottom areas and also do some feather and hair decoration on the shield. Not really sure if that shield design is one a Dog Soldier would use but I like it and once the detail is added it ought to look real snazzy.
-
So, after I finish my baloney sandwich it's back to the shop to pluck some feathers! More photos in the gallery.
Sunday, September 04, 2011
Cheyenne Dog Soldier - Almost Done

Cheyenne Dog Soldier -Roughing It!
Saturday, September 03, 2011
The Road Agent - Finished

-
This has been a real blast to carve and the scarf turned out really well. As I mentioned earlier I kept the colors as dark as possible to carry the mood of this nasty outlaw. If you zoom in on his eyes I added a little red at the corners as he probably has trouble sleeping, worrying about some law dog hot on his trail or maybe he just drinks a little too much Red- eye.
-
Anyway, I hope you like him and hope you'll stop by an check him out in person in Dayton. Just make sure you keep your hand on your wallet!
-
Lots of photos in the Gallery and your comments are welcome as always.
Thursday, September 01, 2011
Cheyenne Dog Soldier

-
The skull cap on the head will serve as a base for all those feathers which will be inserted individually. I read where one headdress had a total of 400 feathers so this will be where the challenge comes in. If it works it should really make an impressive piece.
-
I'll keep you posted with photos as this things takes shape. The Road Agent is setting waiting for the varnish to dry so I hope to have him up on the Blog tomorrow. As always your comments are welcomed and appreciated.
Wednesday, August 31, 2011
The Road Agent - Carving Part Finished

-
To make the scarf I had originally thought of using a nylon piece of cloth soaked with super glue. But that glue sets much too fast to really allow any forming. So I soaked the cloth in Mod Podge and formed it using clothes pins. Took several applications to get the exact shape I was after as I waned it to hang natural. I think it looks pretty good and should even look better once it's locked in place.
-
I decided to go ahead and use the base I had on hand but I cut and added an additional piece to the bottom to make it more massive and stable. He is held in place with a 3/8" dowel painted flat black.
-
So, he's not headed to the paint table to get some color. Will use dark colors to maintain the sinister look. Hope you like him so far and your comments are welcome as always. More photos in the Gallery.
Wednesday, August 24, 2011
The Road Agent

With the base in the photo, which might not be the final one, he stands just about 15" tall. As I've said before...larger figures draw more attention than smaller ones and I want mine to stand out and above any others they might have to compete with. The next step will be the addition of the arms and the mask. I'm going to try something new with the mask by making it out of cloth but treating it in such a way that it will be the most interesting part of this figure. At least I hope so. I'm always on the lookout for new and interesting ways of doing things so if this idea works it has all kinds of possibilities and if it works out I'll tell you how I did it.
One thing I want to mention is that the video production unit will be on standby for a while while I try and get caught up in the shop. There are a lot of empty spaces on the Out West Gallery shelves due to recent sales so if I want to have something to show at Dayton I have to get busy. Also, I've decided to move the Sheepherder project off the burner for the time being. Hopefully, I can get back to it in the not to distant future. Naturally I'll keep you posted with photos and updates on the new figures I'm working on as they progress out of the shop and into the Gallery.
Anyway, I hope you like this new figure. I think he'll definitely be a classic. As always your comments are appreciated. More photos in the Gallery section.
Tuesday, August 16, 2011
Done Gone Under - Finished!

Finally! With all the projects going on around our spread at the moment I actually found the time to finish this little scene. I think it turned out real well even if I did have to change a few of the original ideas I had back when I started. Some always ask how long does something like the take to finish? Well, I did the coffin about 4 years ago so it takes a while before some of these things finally take root and sprout. There are a lot more photos in the Gallery and your comments are always welcome.
-
On a different but sort of associated note......A recent comment was received complaining about how I show some things but never seem to finish or get back to them. A couple cases in point would be the WW2 head study and the recent Road Agent post. Well, here's the way it is and the way it will continue to be: I work at my own pace. My interests wax and wane depending on a number of things. Sometimes I'll see or think of an idea that I will think will be a great carving then completely forget about it and move along with something else. I've always wanted to do a piece with a soldier and I did that head just for a glimpse of what it might look like. Maybe someday I'll get enthused about it again but not for a while. The Road Agents head is setting partially done on my work bench but it too might have to wait while I hope to get started on the Sheepherders scene. Would really like to get that one done before the Dayton show this year. So, there you have it. The purpose of this blog is to share with those of you who are interested in what I'm doing and what I might do. No apologies...just trying to let you know how my creative process works.
Now, back to that shower leak!
Wednesday, August 10, 2011
We Haven't Forgotten You!
A number of you have ask why we've stopped posting. Well, we've had a major house failure due to a leaky shower drain which has been keeping us occupied for the past week and will probably take another week at least to clear up. We blame it all on having too much fun on vacation. Please have patience ..... we promise to get back to carving and posting as soon as we can. Thanks for your understanding.
Wednesday, August 03, 2011
Chuck's On Boys!
Finally got him all painted up. Turned out quite well I think. There are a whole bunch of photos in the gallery. As always, your comments are welcome and appreciated.

Saturday, July 23, 2011
Chuck's On Boys!

Friday, July 22, 2011
Rocky Mountain Highjinks

If you've been wondering why the absence of any posts for the past couple of weeks it's because we've been tearing up the Rockies with our oldest son and his family. That's Judy setting back there in our Ranger. We did as many trails around the Durango-Silverton-Ouray area as we could in a week. Had an absolute blast and the 38 degree temp when going over the Cinnamon Pass would feel real good right now down here in the 104 degree Oklahoma summer.
-
Now.....to get back to some carving!
Tuesday, July 05, 2011
World War II Soldier

Anyway, I hope you like him.
The Road Agent
Monday, July 04, 2011
Let’s Make A Coffee Pot – Part 3
Finishing up this project, we add some color to our coffee pot. Hope you enjoyed this short project. Now I have to come up with something else to pass along.
-
As always your comments are welcome.
Saturday, July 02, 2011
Let’s Make A Coffee Pot – Part 2
With this segment we finish up the carving and attach the handle and other details. Next stop….the paint table.
Wednesday, June 29, 2011
Let's Make A Coffee Pot- Part 1

-
http://www.vimeo.com/25779012
-
The photo to the Cook on the left is one I did quite a few years ago. I can't make out the date which is a good reminder to make sure your photos capture those important facts. He's got his coffee made, cups in hand, and is waiting for the boys to crawl out of their bedrolls and stumble over for a cup of wake-up. As Arbuckles coffee was the brand any good cook would choose I included a case of it and a opened package on top. The cups are tin. Overall a pretty neat little scene.
-
I hope you can follow along and carve one of your own and comments are welcome as always. Here's the video link:
Friday, June 24, 2011
Look What Flew In!

Some more photos in the Gallery and your comments are welcome as always.
Wednesday, June 22, 2011
Carving a Cowboy On His Horse - The Inner Leg Details

-
When fitting the body to the saddle you will no doubt also have to remove material from the saddle. The important thing is that the body should fit into the saddle naturally so it looks like a single piece.
-
Hope this helps you out.
Tuesday, June 21, 2011
Done Gone Under

-
The little poem is one of my own and while it doesn't really explain what his neck was stretched for it's clear that whatever it was he won't be doing it again.
-
I hope to have this one done by the Dayton show. As always your comments are welcome and there are a few more photos in the Gallery.
Saturday, June 18, 2011
The Viking Warrior

-
This has really been a fun project but I'm glad it's over. Doing these carvings via the video process really stretches out the production time of a piece and by the time it's half done I'm just about ready to move on to something else. But I know you folks like those videos so we'll keep them coming. I've already got an idea for the next series which should be even more interesting and a lot more challenging.
-
The symbol on the flag is one I found on the web and I think it really rounds out the character. Once everything was mounted I gave him and the flag a quick shot of Dul-Coat to even everything up.
-
So, if you're making your own version I hope you share it with the rest of us. Maybe we can put them all together and go over and attack that WCI forum and create a little havoc. Again, your comments are welcome and appreciated.
Thursday, June 16, 2011
Viking Warrior – Part 10
With this segment we wrap up the project except for the final flag design, the finishing varnish and mounting him solidly on his base. Personally, I think he turned out great and will make an impressive little character for someone’s display shelf. If you’re carving your own version I hope you had as much fun doing it as I have.
-
As always your comments and opinions are appreciated.
Subscribe to:
Comments (Atom)