

Monday, December 31, 2012
Bottom of the Pile
Half-Breed, Finished

There are more photos in the gallery and your comments are always welcome.
Sunday, December 30, 2012
The Wonder of Details

The longer I looked at this little setting the larger the thing seemed to get: I could actually see the Chuck wagon, the cook and the growing line of hungry wranglers. Even the aroma of coffee and baking bread was starting to float through the air. All these things were brought to life because of just a couple of small details. Sometimes we tend to forget the importance of the small things. Well, to insure that I won't forget, I'm hanging this photo over my carving station to remind me of that lesson.
I was lucky enough to meet Randy and his family this weekend up at Woolaroc. I was surprised to learn that he's only been carving for a few months. Well, if this scene is the product of just a few months I'm starting to get a little worried. Clearly, this beginner is on the right path and he's got his foot on the accelerator. Just to be safe I told him to stay south of the Red River! Only kidding. I'm really looking forward to seeing his next project as I know it will be a good one.
Wednesday, December 26, 2012
Half-Breed

Now for a little history about this fella. Since we've been going to Woolaroc each week for the past month, and since they have the largest collection of Joe Beelers bronzes, I've spent just about every spare moment there over in the museum really getting up close and personal with his work. Joe was one of the founding members of the Cowboy Artists of America with a working cowboy background so he knew most of his subjects quite well. Also, as Frank Phillips, the founder of Woolaroc sponsored him when he first started out I think they have just about every bronze he ever did. Judy and I met him back in 2006 when he was at Woolaroc signing his newest book. He died a week later on April 26 while out helping some neighbors rope and brand calves. A true cowboy to the end. I could put a link here to some of his work but if you're interested just google his name and do a search as there is lots to see over a wide area. He was also an accomplished painter reminding me a lot of Charlie Russell.
He did a couple busts of a Navajo man which were my favorites so I thought I would try my hand a producing one in wood. I named this one Half-Breed as I kind of mixed up the details and added a few of my own. There is a rather large turquoise necklace with a silver pendant hanging on the end. It's hammered copper but I'll paint it silver. His hat band will have turquoise and silver studs. I really like the way they tied up their hair in back. Both Navajo men and women did this same style. The reason one feather is painted is it was left over from a previous carving. The base is walnut, built up from three pieces. With the base it stands about 12-13" tall.
The funny thing about this piece is that when I started it last Monday it was meant to be Chief Bacon Rind, an Osage Chief of Frank Phillips time. By Friday it had changed tribes and moved west to Arizona. Those things do happen around here.
Anyway, I hope you like him as I think he'll turn out pretty nice once some color is applied. There are a number of photos in the Gallery and if you wish to comment please do as I appreciate hearing your opinions.
Monday, December 24, 2012
Merry Christmas From Out West

God bless us, everyone!
Friday, December 21, 2012
Don Quixote - Part 13
Continuing with roughing out the body but a few new things show up.
Don Quixote - Part 13 from Out West Woodcarving Videos on Vimeo.
Thursday, December 20, 2012
Wednesday, December 19, 2012
Don Quixote - Part 11
With this one we cut out the body....at least the upper trunk.
Part 11 from Out West Woodcarving Videos on Vimeo.
Are You Up For An Auction?
 |
| "Have They Left Yet?" |
This time we will cut off the bids at midnight CST on December 24. So the bid placed in the comment section below that is closest to that time wins the carving. Shipping is included in the winning bid. Let's start the bidding at $1.00 and see where it goes from there.
This piece stands at about 10-1/2" tall with the base. It's pretty self explanatory. Poor Private Olsen was unfortunate enough to be designated the one to stick his head up to check on the whereabouts of those pesky Redskins. Fortunately for him there wasn't much gray matter between the entry and exit wounds so his prognosis looks pretty good. His hearing might be a little impaired but according to his Sergeant he never listened to anything he was told anyway....except this once!
So....let the fun begin! The auction is open!
Good Luck!
Monday, December 17, 2012
Chicken-Fricken-What?

This was really a fun piece to do and as I'll probably never do another like it it will have to rate the "Classic" designation, something I don't hand out very often. That scrawny neck on the chicken might look fragile but it's been reinforced with a metal rod so it's not as fragile as it might appear. With the base I'd say it stands around 18-19 inches tall.
Hope you like him as much as I do. There are more photos in the Gallery and your comments are welcome as always.
Friday, December 14, 2012
Don Quixote - Part 10
Carving the crown or bowl of the hat and putting it all together.
Don Quixote - Part 10 from Out West Woodcarving Videos on Vimeo.
Don Quixote - Part 9
Let's give this Knight a hat.....or at least a Barbers Bowl.
Don Quixote - Part 9 from Out West Woodcarving Videos on Vimeo.
Wednesday, December 12, 2012
Don Quixote - Part 8
And here is part 8. Thanks for all those great comments, we really appreciate hearing from those of you who might be benefiting from our efforts.
Don Quixote - Part 8 from Out West Woodcarving Videos on Vimeo.
Monday, December 10, 2012
Friday, December 07, 2012
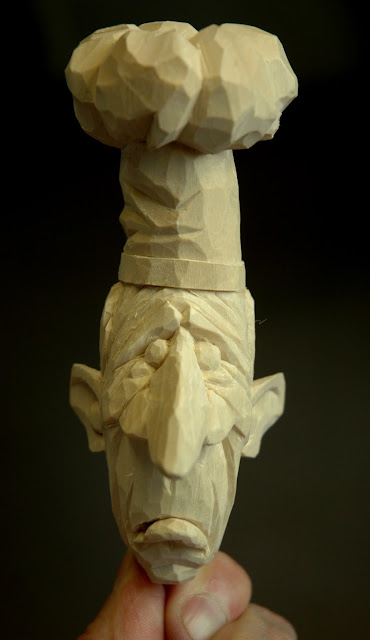
Le Chef - Part 2

I think he's really turning out great and can't wait to start the paint job. Hope you like him.
Wednesday, December 05, 2012
Le Chef
Don Quixote - Part 4
Continuing to rough out the head. I would suggest, when watching the video, to click on the title beneath the video below to watch it on the Vimeo website. You will get a larger picture and you can download it from there should you wish.
Don Quixote - Part 4 from Out West Woodcarving Videos on Vimeo.
Don Quito - Part 3
Here is the next video. We continue to block out the head and face.
Don Quixote - Part 3 from Out West Woodcarving Videos on Vimeo.
Monday, December 03, 2012
Don Quixote - Part 2
Okay, here's the second part and the first video in this series. In it we first make sure our tools are in good condition and then we cut out the head blank. We're going to make the video segments shorted than previous and edit out some of the things we've already covered to speed up the process. Don't worry though, you'll still see anything new in it's complete form and also any mistakes or corrections I make along the way. For those who have followed this blog for a while should have no trouble with this but if a carver just joining needs some in depth instruction I'd recommend going back to one of the previous projects to get the entire process.
So, here we go. One more word.....if you jump too far ahead of the posts you might find the rest of us have headed off in a different direction. It would be best to just follow along as the videos appear. We'll try and keep it active.
Don Quixote - Part 2 from Out West Woodcarving Videos on Vimeo.
So, here we go. One more word.....if you jump too far ahead of the posts you might find the rest of us have headed off in a different direction. It would be best to just follow along as the videos appear. We'll try and keep it active.
Don Quixote - Part 2 from Out West Woodcarving Videos on Vimeo.
Don Quixote - Part one

But first we will do the head and after Goggling around the images of this character I found two that will start us on our quest for our own illusive windmill. The painting to the left illustrates the type of helmet we will attempt and the other picture in the Gallery will be the face we'll be after as I want him to look kind of sad and certainly worn out from his search.
So, sharpen your knives cause here we go!
Any Suggestions?
I've been setting here trying to think up a good project for our next video series. Now, I know that some of you are really interested in putting a Cowboy on a horse but I'm not really open to that one yet as I've just finished doing that and would like to try something else. So, I'm open to any suggestions provided they can be done by an intermediate carver who's pretty good at the basics of carving but would like to stretch themselves a bit.
Put your suggestion in a comment below. Thanks.
Put your suggestion in a comment below. Thanks.
Monday, November 26, 2012
The Big Show

Anyway, hope you enjoy the video and the photos. I really can't tell you how honored I feel when I walk into that room and see My work so prominently featured in such a major museum. Wow!
Friday, November 16, 2012
Setting Up The Display

So, all we do now is wait in anticipation for that 10:00am opening next Friday. Judy and I will be on hand the first two days and then every Saturday until January 6 when the show closes. If I'm not too nervous I might even try some demonstration whittling. I'll try my best to post a video of the display before the doors open. Even better I hope those of you who can make the trip up or down to Woolaroc Museum will stop in and take a look.
Tuesday, November 13, 2012
Dayton Show Results
I'm not one who usually brags but several of you have ask how I did at the show so here are the results of the competitions I entered:
Bust..................1st Rough Night
- 2nd Red Horse
Single Figure..... 1st...Sorry Boys! It's Beans Again!
- 2nd..The Pot Seller
Figure 15"......... 1st..Any Complaints?
Group................1st ..The Boss
- HM..Slim Pickins'
Best of Category....1st
- 2nd
As always, the competition was pretty tough and there were some new carvers who only added to that. Needless to say, I'm more than satisfied with the results. Now, with the CCA being the featured exhibit next year, and being that their display will be directly across from mine, I'd better get busy cranking out some new pieces.
For those of you who missed the opportunity to attend this event you really ought to make plans to put it on your things to do. It's clearly the largest and best organized event in woodcarving you'll ever find and it just seems to get better each year.

Friday, November 02, 2012
The Grinch - Painted

Hope you like him.
Wednesday, October 31, 2012
The Grinch

Sunday, October 14, 2012
Wrapped In Glory
.JPG)
I penciled on the lines for the design and then lightly burned the breaks. I applied the paint pretty straight from the bottle on the wet surface to get the strongest color. I think those strong colors really bring out the softness of his face. Even the hat was painted straight but that too appears soft compared to the flag. The gold choker also amplifies the richness of the whole piece. Just my opinion.
I painted the hair a dark gray before dry brushing on the white. Instead of using Moroccan Red on the braid wraps I used straight Red Iron Oxide as I wanted a clear definition between those two red colors. The hat is Midnight Blue, shaded with black. I think the skin tones could be a little darker but overall everything seems to work so I'll leave it as it is. As I mentioned earlier the earrings are pounded brass painted gold.
The piece stands just over 15" with the base so it will be pretty impressive setting on the display stand or the Judges table. There are more photos in the Gallery and your comments are always welcome.
Wednesday, October 10, 2012
The Old One

Still sticking to my plan of carving a Native American, then a Cowboy then back to an Indian. They can't say I don't believe in equal opportunity! Next up is a sour faced wrangler informing all who enter the museum show that they'd better keep their hands off the carvings or he'll have to put the sign down and possibly do some damage. Completed the head yesterday at our weekly carving and B.S. session downtown and he's looking pretty nasty!
Oh.....if you haven't see it yet, check out the neat write-up about my upcoming show at Woolaroc in the latest High Noon eMagazine Smoke Signals. You can find it at: http://www.highnoon.com/aboutsmokesignals.htm. It's under the "In The News" section. Have to thank my friends James and Tammy over in Harrison, Arkansas for submitting it to them. High Noon is probably the largest dealer of western artifacts and memorabilia in the U.S. and also a great research site.
We stopped by the Museum on our way home from Colorado last week and had a long conversation with the Director. Even got a tour through one of the back storage rooms which was really neat. Saw a model Chuck Wagon which made me humble but the really great thing was when he handed me a bronze off of a dusty shelf and said "Here's a Charlie Russell!" Me, standing there holding a Russell bronze! It doesn't get any better than that!
Friday, September 28, 2012
Making Boxes
Want to know how to pack your carvings so they'll arrive safe? Well, here are two videos which will show you how I go about it.
The Cherokee Kid

For the rope I use a larger size of commercially twisted wire available at Lowes so as to bring it into scale with the figure. There are some more photos in the gallery and your comments are always welcome.
Saturday, September 22, 2012
Will Rogers - Part 2

Hope you like him.
El Jefe - Painted

Thursday, September 20, 2012
El Jefe

He's pretty good sized, standing about 15" with the base. Hope you like him and there are a couple more photos in the Gallery.
Wednesday, September 12, 2012
Will Rogers

Sunday, September 09, 2012
Hot Tamales

The Pot Seller

As I mentioned earlier, I turned the pots on my lathe and then whittled them to look more in line with the girl. Well, while that looks nice it certainly maid painting a lot more difficult. To get the rings to look good I put the painted pot back on the lathe and with a marker slowly turned the wheel while holding the marker as steady as possible. Had the pot been completely smooth as it was originally this would have been an easy job but with all those little divots the pen zigged and zagged each time it hit one. I had to go back with a brush and clean things up the old way. Another problem was those markers. For some reason they just don't seem to work well on a varnished surface. Must be some kind of chemical interaction between the pens fluid and the varnish.
Anyway, I hope you like her as much as I do. More photos in the gallery and your comments are welcome as always.
Monday, September 03, 2012
The Pottery Seller

I spent about as much time turning and whittling those five pots as I did carving the figure! I first turned them on the lathe and then, because I didn't want them to look out of place with the textured of the figure, I whittled the surfaces. The dark pot is walnut but it will be painted over as will the others. Want them all to look like fired clay which will be a couple of tan colors. I'm thinking a white/beige color for the blanket with red and blue stripes. Should balance out well with the black hair and the blue of the turquoise. The skirt will probably be black or a very dark blue.
I have no doubt that this will be a classic once done and someone is going to get a great piece of original work. Hope you like her. No more photos time time but your comments are still welcome.
Saturday, September 01, 2012
Hopi Maiden Part 2

I've got something really special planned for her setting which should be a real winner....at least I hope so. She's working on her dowry so she's been busy down at the clay wall scooping out a supply to flesh out her inventory.
Stay tuned!
Friday, August 31, 2012
Hopi Maiden

The hairstyle is what sets off the piece. It's know as a Squash Blossom. If your a Star Wars fan you'll note that Princess Leia also put her hair up this way. You will also note from the photo that I've left the eyes closed. Haven't decided whether to open them up or not. I kind of like it this way. She'll be wrapped in a Hudson Bay Blanket, probably red and there will be a little Turquoise in the final mix. Should be a colorful piece.
Hope you like her so far and there are a couple more photos in the Gallery and your comments are appreciated and welcomed.
Hot Irons & Arbuckles

I hope you like him and there are more photos in the Gallery. As always, your comments are welcomed and appreciated.
Wednesday, August 15, 2012
The Boss Of The Outfit - Finished

Hope you like him and there are more photos in the Gallery. As always, your comments are welcomed and appreciated.
Wednesday, August 08, 2012
Carving A Pair Of Vultures - Part 10
This will wrap this little scene up. Thought I would show you how I go about creating the little, or even big, signs for my carvings. It's a pretty easy process and one easy to get the hang of after a little practice. The secret is the brush and a steady hand.
SLIM PICKIN'S

There are a bunch of photos in the Gallery. Hope you like this little scene and I look forward to your comments.
THE BOSS

Thought I would give this one a little twist by putting a derby on his head instead of the usual Stetson. Being the Boss he's probably not in the sun all day so doesn't need that wide brim as he probably spends most of his time with his nose in the books or down at the bank trying to wrangle another loan. He's about 15" tall with the base so it's a nice piece that will command attention. I gave the horse a snaffle bit and you can see a metal rear cinch just behind his leg.
Hope you like him and there are more photos in the gallery. Comments welcome.
Carving A Pair Of Vultures - Part 9
Moving right along, this segment deals with making a small sign to put on that pole. A number of you have ask me how I go about creating these little signs so here is the lowdown!
Carving A Pair Of Vultures - Part 8
We're just about ready to wrap this project up but there are still a couple of things to do to really put the final polish to it.
Saturday, August 04, 2012
Friday, August 03, 2012
Carving A Pair Of Vultures - Part 5
Things are really starting to come together. In this segment we set the skull into the surface and add an additional detail. Having fun yet?
Wednesday, August 01, 2012
Carving A Pair Of Vultures - Part 4
With the birds carved we can now get down the the fun part of assembling a scene.
Tuesday, July 31, 2012
Captain Jack

Hope you like him. He stands about 13" tall with the base.

Saturday, July 28, 2012
Tuesday, July 24, 2012
Carving A Pair Of Vultures - Part 2
In Part 2 we pretty well finish the body before running up against the clock. There's enough of it to get you on your way though.
Saturday, July 21, 2012
Carving A Pair Of Vultures-Part 1

In this first part we lay out the blanks, cut them on the band saw and get ready to do some carving.
Friday, July 20, 2012
Frank Phillips - Oilman

Frank Phillips not only created the setting for the museum, it was his lodge and hideaway outside of Bartlesville, Oklahoma, he was the founder of Phillips 66 petroleum company back in 1917. Here's a link to the museum which I consider houses one of the best collections of western art and artifacts in the U.S.: https://woolaroc.org/pages/museum-and-art. Along with the additional photos of this piece in the Gallery, I've included a picture of Frank dressed up as a cowboy which I used as a guide. From what I've read and seen, he liked to dress up and play the part of one while at his lodge. Considering this I thought I would alter that photo just a bit and really make him into a working wrangler. Hopefully he'd approve. The carving is pretty large....standing just short of 24" on it's base. While the carving part was a little more difficult than normal considering it's size it was the lettering that was the hard part. My eyes just ain't what they used to be. I think it turned out pretty good overall. It's difficult to capture a live person in a caricature without distorting the features which is something I didn't want to do.
Anyway, I hope you like him and now, with this behind me, maybe we can get back to normal ops and turn out a new video or two. As always your comments are welcomed and appreciated.
Thursday, July 05, 2012
Short Circuit - Finished!

Hope you like him and there are more photos in the Gallery.
Thursday, June 28, 2012
He Gets His Umbrella....or whats left of it!

White Eagle - Finished

Hope you like him and there are more photos in the Gallery.
Monday, June 25, 2012
Short Circuit!

He's a lot taller than the others which were around 10". This guy, with his base should be around 15" and that's not counting the umbrella. I'll make that out of brass rod. His left hand will be holding a lasso. I carved the crown of his hat extremely thin and then used a couple of lit matches to burn the top of it off. You can see that better in the gallery photos. Although it doesn't show in the photos you can see the top of his skull down through the open crown. Should be a neat piece when done and a quick sale as all the others weren't around the place too long.
Anyway, hope you like him and your comments are welcome as always.
Thursday, June 21, 2012
White Eagle

I attached the two feathers to the head with wire . Still debating whether to let them swing free or to glue them in place. We'll see how it goes after the painting is finished. I made a mistake when cutting the bottom of the blank which resulted in a steep angle. So, thinking what the hell, I just cut a matching angle on the piece of walnut and it turned out more interesting than it would have. The discoloration on the tips of the robe is where I soaked the areas with super glue to give it some strength.
Anyway, hope you like him so far and your comments are welcome and appreciated. More photos in the gallery.
The Bottom Of The File

For the blood I reached for the richest and darkest red I had then mixed in a little brown and dribbled it directly out of the bottle down onto the scarf. Once it was dry I over coated it with clear epoxy to make it look fresh. I didn't add any design to the scarf as I really liked the bright yellow. I did underpaint it with yellow ocher before a final coat of bright yellow. Lastly I highlighted the folds with a light brown wash.
As I mentioned earlier, I have another one of these hapless wranglers in the works which will be more banged up than this guy.
As always, your comments are welcomed and appreciated. More photos in the Gallery.
Friday, June 08, 2012
Busted Up!

Thursday, June 07, 2012
A Rough Night!

Hope you like him and there are a few more photos in the Gallery. Comments welcome as always.
Oh....I forgot the broken nose!
Saturday, June 02, 2012
Buffalo Skull - Part 5

And here is Part B:
Horses For Sale

Wednesday, May 30, 2012
Saturday, May 26, 2012
Buffalo Skull - Part 3
We wrap up the skull with this one. In the next segment we'll work on the horns.
Monday, May 21, 2012
Buffalo Skull - Part 2
Saturday, May 19, 2012
Red Horse - Finished!

The horse dance stick has a horse hair mane, a wire bit and leather reins and decorative strips front and back. These do a good job of hiding the large dowel that holds the shield to the body. I used a technique I used before on some lances to simulate fur on his hair wraps. After carving them I gave them a heavy coat of Mod Podge and then sprinkled on some fine gravel. Once dry I painted it a dark tan then emphasized the divisions with a darker brown and to finished it I dry brushed on some light tan. I think it looks pretty good and adds a lot of interest and texture to the piece. If you look at the large head feathers from the back you'll note some heavy texturing where they are tied together. For that I use acrylic modeling past, stippled on and then painted. I think it looks pretty good.
There are lots of photos in the gallery and I look forward to your comments.
Wednesday, May 16, 2012
Carving A Buffalo Skull - Part 1
A number of you have asked that we do a series on carving a Buffalo Skull so here's the first part.
Saturday, May 12, 2012
Red Horse

-
As I've mentioned before, I really love doing this type of carving as it's a challenge to see how much detail you can add. Also, as they are so colorful and unique they sell immediately. I've seen a lot of painted bronzes but they seem cold compared to these wooden fellas.
-
Anyway, hope you like him so far. As you can probably tell I've been alternating from Cowboy to Indian and back to Cowboy. Going to have to break off of that track soon and do some horses and especially a Sheepherder.
-
As always your comments are welcome and appreciated.
Tuesday, May 08, 2012
Jim Cleans Up!

Way to go Jim!
Monday, May 07, 2012
"Sorry Boys! It's Beans Again!"

I used ash right out of my shop stove to color the bottom of the oven and for the coals on the lid and underneath the dutch. Also sprinkled a few around my logs in the fire. For the logs I used twigs but blackened them with a torch. Funny, when I torched them there was actually a little fire going on. Looked really neat when I blew it out and the smoke curled up through the tripod. The shovel sort of rounds out the scene as that area would be kind of empty otherwise.
So, I hope you like him as much as I do and I sure hope the ramrod lets them dispatch a steer soon so those boys don't revolt and take it out on our little cook. More photos in the gallery and your comments are appreciated.
Wednesday, May 02, 2012
One Job Old Reliable Can't Do!

And no.....that's not me up there! I may be a little crazy but I'm not that crazy!
Subscribe to:
Comments (Atom)