
This will be the final chapter in our Cook's journey to a life on the range. So far he's endured cuts and nicks, a couple of transplants, some plastic surgery, he's even been hosed down a few times! But, here he is...looking sharp and skilled in the art of prairie breadmaking and able to cook a pot of beans as good as the best of them.
With this post we will paint the design on the apron and, as a final touch, put a watch in his pocket.
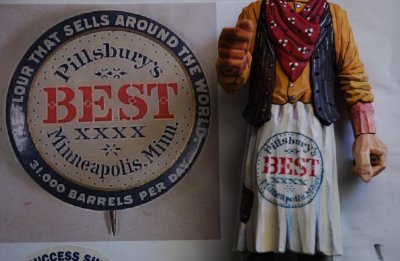
When looking for a design, I always try to locate one that would be correct for the period of the figure. In this case around the early 1900's. I found this Pillsbury logo during a search on the Net. I did away with the outer dark blue ring as it would have been overpowering. The Gold Medal Flour logo also gives good look to any cook. You could even make up your own.
Before you start with the design, go ahead and give your figure a coat of Polyurethane Satin finish varnish. When you buy varnish always try and get the smallest can available. Poly will turn an amber color and thicken over time and when it reaches that point I toss it out. On areas where the paint was heavy the varnish will shine. To prevent this I use a paper towel to carefully wipe off the excess. DO NOT USE CLOTH OR TISSUE! It will leave residue and mess up your piece.
Once the figure is dry go ahead and glue everything in it's proper place. If you think you would like to put a nameplate on the base like I did you can get a nice one, fairly inexpensively and quick, from: www.signsbygwynn.com. I use the A-30 size, double-line block for the title and script for my name.
So, that's it! I hope those of you who carved a cook will send me a photo. I'll put them together and post them here. I plan on starting a new project in the next couple of weeks and will do something aimed at the beginning carver.
Happy Trails!!!
still chugging away on mine! Its fun, but I sure can't see how you pump them out so fast! Guess its from repetition...probably still have another week in mine lol.........Dave
ReplyDeleteI am still of the opinion this whole blog should be in the form of a book! :)
ReplyDeleteWell why not do that Dave, not a big job really now that all the pictures and text is done.Smile.
ReplyDeleteGord
Just a thank you Lynn for the camp cook tutorial, much appreciated.
ReplyDeleteGord
Bill....You shouldn't need to coat the Firepit part of the base. Only the bottom hardwood and middle bassword pieces need to be finished. Looking forward to seeing the finished product.
ReplyDeleteHi Lynn!
ReplyDeleteI'm to carving and your blog, but love all the effort you put into it and the level of information you're sharing. Very inspirational.
Is the design in the cook's apron all done by hand? What aid(s) did you use to layout the design on the irregular surface before painting?
Thanks and PLEASE keep posting your work, it's great.
Ron
Kelly...The Cook lessons begin in the very first postings. With each post there are associated photos which guide you the way through each step. Just click "Additional Photos" at the bottom of each post and then open the photo gallery associated with it. Hope this helps. Lynn
ReplyDeleteLynn,
ReplyDeleteThanks for the instruction. I just finished the Camp Cook. Here is the address if you would like to check it out.
http://www.stcharlesareawoodcarvers.com/images/sample-cook-big.jpg
Great job Wyatt. Glad I could lend a little assistance.
ReplyDelete