Wednesday, May 31, 2006

Finishing Up: Apron Design and a Watch Chain


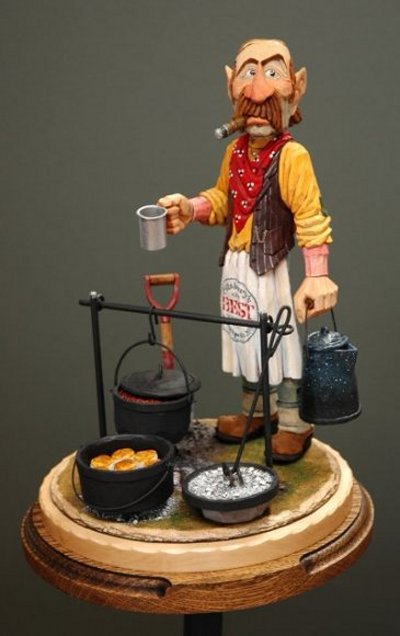
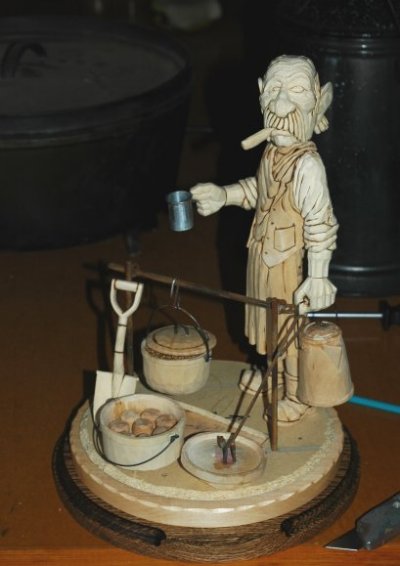
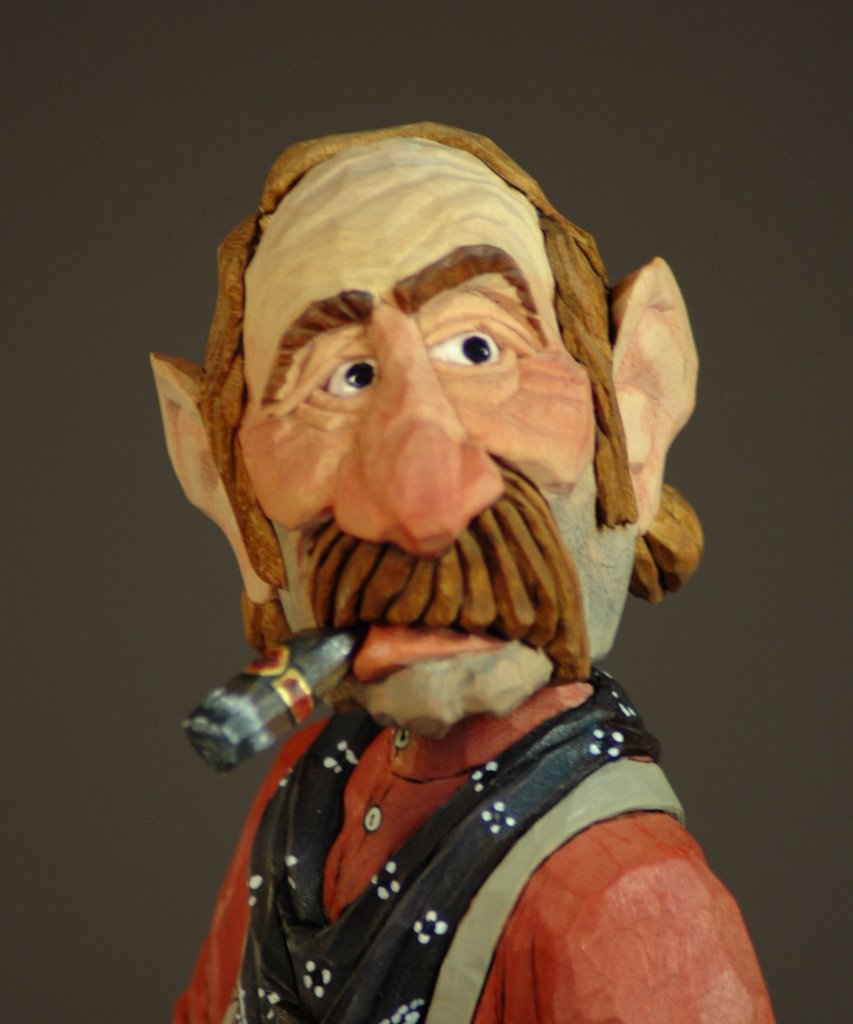
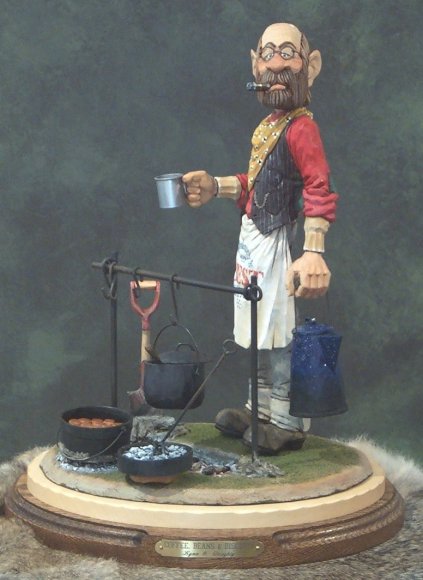
This will be the final chapter in our Cook's journey to a life on the range. So far he's endured cuts and nicks, a couple of transplants, some plastic surgery, he's even been hosed down a few times! But, here he is...looking sharp and skilled in the art of prairie breadmaking and able to cook a pot of beans as good as the best of them.

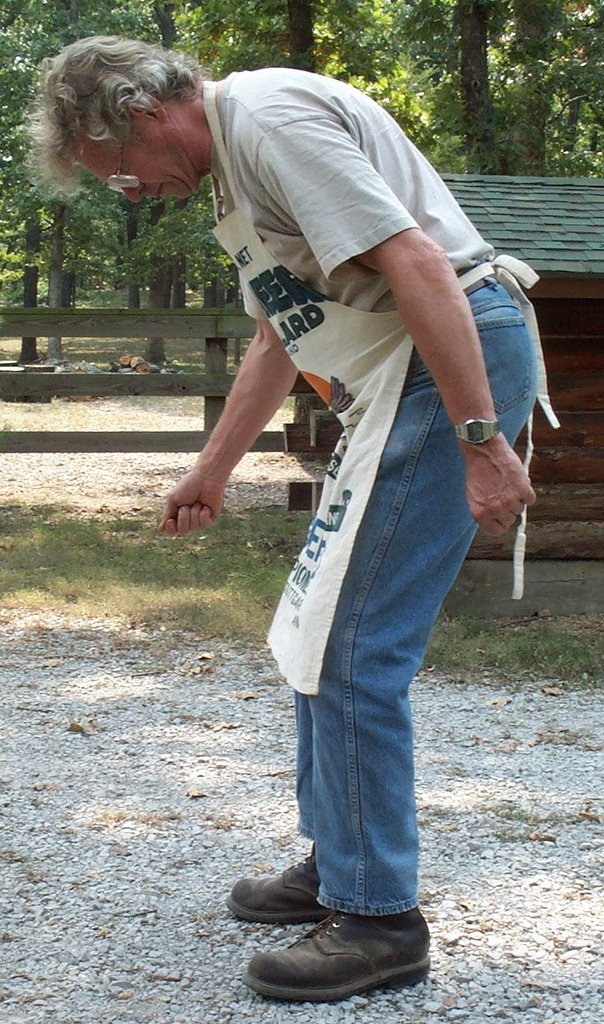
With this post we will paint the design on the apron and, as a final touch, put a watch in his pocket.

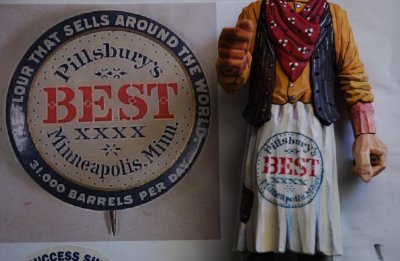
When looking for a design, I always try to locate one that would be correct for the period of the figure. In this case around the early 1900's. I found this Pillsbury logo during a search on the Net. I did away with the outer dark blue ring as it would have been overpowering. The Gold Medal Flour logo also gives good look to any cook. You could even make up your own.

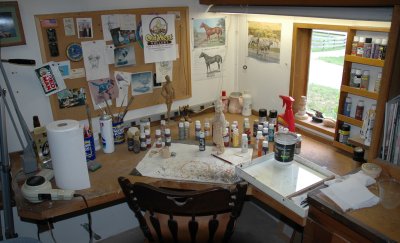
Before you start with the design, go ahead and give your figure a coat of Polyurethane Satin finish varnish. When you buy varnish always try and get the smallest can available. Poly will turn an amber color and thicken over time and when it reaches that point I toss it out. On areas where the paint was heavy the varnish will shine. To prevent this I use a paper towel to carefully wipe off the excess. DO NOT USE CLOTH OR TISSUE! It will leave residue and mess up your piece.

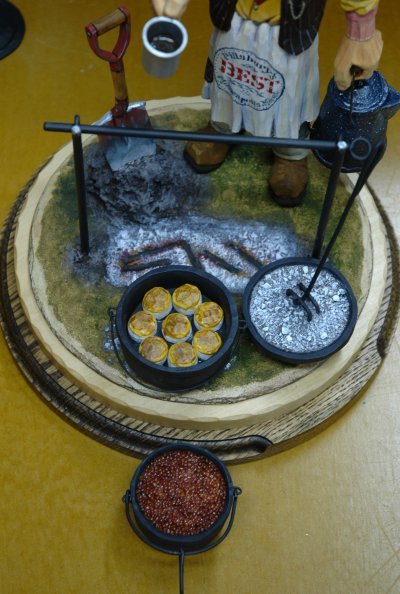
Once the figure is dry go ahead and glue everything in it's proper place. If you think you would like to put a nameplate on the base like I did you can get a nice one, fairly inexpensively and quick, from: www.signsbygwynn.com. I use the A-30 size, double-line block for the title and script for my name.

So, that's it! I hope those of you who carved a cook will send me a photo. I'll put them together and post them here. I plan on starting a new project in the next couple of weeks and will do something aimed at the beginning carver.

Happy Trails!!!

Saturday, May 27, 2006

Painting the Body


Now we start painting the body. Here are the colors I used:

Jeans--Midnight Blue
Boots--Asphaltum (Brown) and Black
Shirt---Yellow Ochre
Vest---Chocolate Cherry (Dark Purple)
..........Irrediscent Red
Hanky-Chocolate Cherry with white highlights
Scarf--Moroccan Red
Apron-White

The attached photos will give more detail on the use of these colors.

On the cooking implements, they are painted Flat Black. I sort of winged it on the Shovel. Painted the metal parts Moroccan Red and came back with silver to indicate the wear areas. A Light Brown wash on the wooden parts. Used the button technique to paint on some rivets on the handle.

The Beans were painted Raw Sienna with Red highlights. The Biscuits were painted white and I came back and painted Yellow Ochre on the tops and then a thin wash of Raw Sienna to indicate browning. These were then glued in the Dutch Oven with a small drop of Epoxy on the bottom of each biscuit. The Coffee pot is painted Midnight Blue with the bottom painted Flat Black to indicate smoke from the fire. I then took an old toothbrush, dipped it in White and lightly flicked on some spots. Practice before doing this!!! Done right it looks just like enamelware.

Next we do the design and some final touches.

To be continued......

Friday, May 26, 2006

Painting the Head


Here is a list of the paint colors I used to do the face:

Red Iron Oxide
Yellow Ochre
Asphaltum (Brown)
Midnight Blue
Burnt Umber
Black
White

Remember when applying paint it's best to apply too little than too much. But, if you see you've applied too much, quickly load your brush with clean water and 'erase' as much as the color as possible.

Also, a very important rule is to keep your hands clean. Wash them before you start and frequently while you're painting. And, even more important still..

BE PATIENT AND TAKE YOUR TIME!

Every once in a while you will see Old Reliable in the photos while I'm painting. I always keep him handy to clean up any burrs that might show up during the process. Wetting the wood brings a lot of these out. Another benefit of wetting the wood is that it will close up a lot of the little cut lines.

Again, just take your time and have fun. Painting brings your character to life so let's make sure he has a good one ahead of him!

To be continued......

Wednesday, May 24, 2006

Down the Homestretch!

Before we get our brushes wet let's talk a little about painting. As you can see by the photo, I have an area in my shop devoted completely to painting. I realize not all of you can do this but I wanted to show the different things I use when a figure reaches this stage. Directly to the right of my chair you will see my paint box. I paint with acrylics so this box, when I put the lid on, will keep my paint from drying if something comes up to where I have to leave. You can get by without it but it's a nice tool to have. Inside the paint box I have a piece of glass which is where I mix my paints. Glass lets me see right through the different washes of paint I'm using and also lets me see how much will actually go on the figure or item I'm painting. When I'm through, a razor blade will quickly scrape off the dried or unused paint and give me a clean surface to begin again. I keep my water container in the box and my brushes right next to the glass. To the right of the box is a paper towel to wipe my brushes and a tub of Brush Soap I use to help clean out the color.

In front of the pad are the various colors I use along with a spray bottle filled with clean water. To the left is a roll of paper towels and a hair-dryer. I use the hair-dryer to speed up the drying process if needed. A heat-gun would be much too hot. The little window looks out on my Gallery parking lot just in case some customer happens by!

I have lots of different colors of paint but have come to rely on just a few. These I'll point out as we go along. I buy my paint at Hobby Lobby, Wal-Marts Craft section or could order it if necessary. I've been painting for close to 30 years using these craft paints and find that the quality is pretty consistant. Best yet....they're cheap. One thing I will recommend is that you get you some GOOD brushes. Sable hair is good. They might cost more but will last a long time if you keep them clean.

So....Let's start painting!

To be continued.....

Building A Fire


Before we begin this part of the project let's get everything ready. I forgot to take a couple of photos that would have probably made some things a little clearer but, as this Blogging is new to me, I forgot. So I'll try and explain where we should be before we start the fire.

Your 3 base pieces should be complete enough to be assembled. The bottom stained and varnished, the middle varnished and the top painted and planted with grass. Now is the time to do the following:

Stack the three pieces exactly in the final position you want them. With a pencil, mark the mounting holes we've drilled onto the middle piece. Now, remove the top and mark and drill four screw holes to anchor the middle to the bottom to where the screws will not interfer with the dowels . Screw these two parts together making sure the screw tops are flush with the surface.

Now, reposition the top piece and, using some 1-1/4 inch brads, nail it into position. Place your nails in areas where they will not be seen, i.e., under the Dutch Oven, under the Cooks feet, under the rock. If you need to nail into an area that is not hidden just cover the nail head with some Mode Podge and then some grass. No one will ever know.

With the three pieces firmly together redrill all your dowel holes and the 3/16" holes for the metal uprights. You can go ahead and glue these uprights in place. Now we're ready to build the fire. The attached photos explain the steps to follow for both the fire and the coals for the Dutch Oven and Lid.

Note: See the Dutch Oven lid above? Notice the other piece of wire thats attached to the lid handle? That is a Dutch Oven Lid Lifter. You can omit this little detail and no one but an authentic Chuckwagon Cook will ever know the difference. I use them when I cook so I made one and put it in place.

Good luck.

To be continued.......

Tuesday, May 23, 2006

Scenery 101


With this post we are going to leave woodcarving for a while and concentrate on scenery. Our first step in this is to position our figure and all his cooking gear exactly where we want it. Once that is done we are going to drill 1/8" holes in the bottom of each piece as follows:

Figure...Two holes in each foot. One in the heel and one in the sole. Careful...don't go all the way through.
Dutch Oven...One hole in center .
Dutch Oven Lid...Two holes through lid and down through the carved rock.

This is all outlined in the associated attached photos.

Special Note: In doing the scenery I talk about Fine Gravel. This might sound confusing to you so I'll explain. I go down to a country road nearby and scoop up a bucket full from the side of the road. I come home and screen it till I can sift it through a piece of old nylon hose. I use this in place of regular dirt as dirt mixed with water turns to MUD. I don't want mud, I want it to retain it's texture when wet. This very fine gravel does this. It works great.

I think if you follow the attached photos you should have no problems. If you fooled around with model trains and have done some track scenery you will have no problem at all. Thats where I picked up what knowledge I have. If you want, go to a Hobby Shop and buy a book on model rail scenery. That will really put you on the right path.

If you think you need some practice before tackling this part of the project here is a suggestion...Make a small base for a single figure already in your collection that doesn't have one. This way you can practice all the steps outlined here and at the same time maybe make one of your previous carvings look even better.

In the next post we will build the fire.

To be continued.......

The Head...Completed


Like in the previous post, just continue on, taking your time. Once the head is complete, the hair lines are burnt in, being careful not to overburn. Then I lightly sanded it on the San-O-Flex wheel, keeping my thumb over the nose until the very last so not too much wood is taken off. Don't want him to have a smooth and shiney nose. The fine grit on the sandpaper lets you protect these fragile areas with your fingers or thumb without worrying about losing your fingerprints. Don't burn the eyebrows, paint will make them stand out.

As you can see by the photo I use a very simple "cartoon" ear detail. No need to go overboard. Also, insteadof spending a lot of time trying to make realistic hair with a v-tool I just indicate the direction of the flow of the hair with my knife. To me that's enough. This is a caricature.

So, the head is complete. Now the really hard work begins!! (Only kidding!)

To be continued......

The Head...Continued


With this post we are going to continue working on the head. I am not going to spend a lot of time explaining each individual cut as I think you are competent enough to handle this yourself. There are plenty of photos for reference and the next post will have even more. Just don't rush the detail and take your time.

One thing before you start.....STROP OR SHARPEN YOUR KNIFE!

Doing fine detail, like around the eyes, ears, and nose, you need a knife that has a very sharp and flexible point. This is why I like Old Reliable. It is extremely sharp when stroped a few times and the point is thin and flexible. Keep your cuts to the minimum. Like chip carving, ideally you want to make one cut and then another to let the chip fall out of it's own accord. Constantly returning to the same area will chew up the wood to the point that it will no longer hold detail. Try not to go directly straight into the wood with the knife. I find that coming in at an angle and then using another angled cut in the opposite direction makes for a cleaner cut. This is because you are not cutting directly across the grain. Naturally, there are exceptions where this is not possible. But this is a rule to follow if at all possible.

To be continued........

Sunday, May 21, 2006

A Preview


I finished up the Cook this morning. As a lot of you are having difficulty visualizing the finished product I thought it might be a good idea to show you how it finished up on my end.

I am a little hesitant to do this as I'm afraid some of you will ignore the posts still to come. But I'll take that risk. One thing I will ask is don't come at me with questions on areas that haven't been covered yet. I'll try and answer those as we move along.

So.....I think he turned out pretty good. Remember my comment earlier about plastic surgery? Well, here's the story.

I completed the head and thought it was going good. Unfortunately, once it was painted I was not satisfied at all at the outcome. Hmmmmm....what to do. Carve a new one or try and save the one I have. Could I recarve it even though it had been painted? Hmmmmmm....Well, what the H***! If it doesn't turn out it was headed for the woodstove anyway so here goes.

I shaved all the eye detail completely off the face and redid them. It worked! Later on you will be able to compare the first face with the one here. I'm not going to show you how the first one looked painted. I'll keep that secret.

To be continued......

Saturday, May 20, 2006

A Base and a Shovel


Hey! That looks pretty good! I always stop and do the base when I reach this stage of a scene. It lets me see how the whole thing will appear once it's done.

A few comments on bases...A base, like a frame for a picture, can make or break a carving. I've seen lots of terrific carvings ruined by their being placed on a lousy base or by having no base at all. I've seen some lousy carvings really shine because the carver took the time to make an impressive base. Best of all, I've seen some terrific carvings mounted on outstanding bases that seem to always walk away with the ribbons. That's what we're after here.

I use red oak, walnut, maple, cherry, any nice hardwood for the first layer of my three layered base system. I use a piece of thin basswood for the middle layer as it nicely separates the dark hardwood base from the scenic area on top. It just seems pleasing to me. I could probably get by without the basswood middle but that's the part that has my name on it so it stays! I'll stain the hardwood a dark walnut color then, when dry, a couple coats of polyurethane. The basswood just gets a couple coats of polyurethane. The top part we will scenic later on. No rush here.....just taking our time.

Carving the shovel: This should be easy for you. I went out to my Chuckwagon and used the shovel hanging on it's side as a guide. That shovel has had holes cut in the scoop so I can pick up a load of hot coals from the fire pit, give it a few shakes to get rid of the ash, and then dump them either under the Dutch Oven or on top the lid. Be careful cutting that hole on the handle.

To be continued.....

Roughing Out The Head


With this step we'll start to see our figure show some signs of life. I'm not going to spend a lot of time showing each individual cut as I think the photos pretty well show what I'm doing. Like I said starting out, it's assumed you've carved a few figures already so you should have the basics down. However, I will tell you what not to do. Here is the cardinal rule of woodcarving....

"Don't Rush The Detail!"

Take your time laying the groundwork for the detail by constructing a solid base for it. Just take your time.

I do my heads separately because this allows it to be moved to the optimum angle with the body for the best effect. Just the slightest shift of the head can change the whole attitude of a piece. You can have him looking right or left. By carving a different angle on the neck you can have him looking up or down. If the head your working on or have just finished doesn't do what you want...give him a transplant! Do some plastic surgery! I'll go into detail about the plastic surgery part a little later.

To be continued......

Biscuits, Beans and a Cup of Coffee


It's time to bake some biscuits, cook some beans, and make our tin cup so we can sample some of that Cook's campfire coffee.

The biscuit part is easy. The beans shouldn't be that difficult as you've already done similar steps when you made the Dutch Oven. For that reason I'm not going to dwell on how to make a bean pot as you should be able to figure that out yourself. You might have to raid your spice rack for some Mustard Seeds.

The Tin Cup will require some of that 7th grade metalwork training you thought you'd never use and have long forgot. A small soldering iron, solder and flux and a piece of scrap tin will get you over this hurdle. Just don't burn your fingers.

To be continued.......

Thursday, May 18, 2006

Reference Material


I've been ask how I obtain various reference material for my carvings. I have a complete library of books about the Old West that contain tons of info. However, I'm always on the lookout for more. I subscribe to a number of magazines dealing with the west, horses, western art, etc. When I see a picture of a scene I like or a piece of equipment I'll clip it out and glue it into a scrapbook devoted to a certain subject, i.e., Cowboys, Indians, Horses, etc. I have a number of these scrapbooks and they are always getting new material.

One of the most useful tools I have and use on a constant basis is my Digital Camera. As you can see by the photos associated with this post it comes in real handy. It only takes a minute to set up the pose, take the photo and have the wife run up the hill and print them out. I then have an exact reference to work from.

With Google, Yahoo and other search engines you can now find just about anything you're looking for.

The Right Arm


I did not include a pattern for the Right Arm. You should be able to make this on your own. It's the same as the left, just bent at the elbow. You can see by the photo just what we're after so it shouldn't be that difficult.

Here is where doing an arm as a separate piece becomes important. See that arrow on the arm? That indicates the direction of the wood's grain. If the arm was cut as part of the body's blank it would be running opposite of the arrow. So, when finished, it would become very fragile at the wrist and run the risk of breaking off. People have a habit of wanting to touch things, especially woodcarvings. By doing it as a separate piece we have solved the problem of it possibly breaking off.

Then why did we do it on the left arm? Why not? Sure made it easy did't it. It also allowed us to get that coffee pot hanging just right. Cheating? Maybe to some. Not to me. I look at a piece of wood as if it were a block of clay. While I can take some off I can also add some back on if I need to.

When you're finished with this step the body, aside from a hole for the head, is finished.

To be continued.......

Wednesday, May 17, 2006

A Coffee Pot and a Dutch Oven


Before we add the right arm, let's go ahead and make the Coffee Pot and the Dutch Oven. These might look kind of difficult but they're really quite easy to do if you have the right equipment. Most of the work is done by your saw and a drill. Those of you who don't have access to a drill press and a set of Forstner bits can accomplish this task by cutting out the center of the oven and lid on a jig saw and then glueing in a false bottom. All the joints will be hidden.

This oven is made to accept 8 biscuits made from 5/8" wooden dowel. This is just the right size for this scene.

Note: I have edited this post for the size of the biscuits. I had originally typed 3/8" vs. the 5/8" now shown. The smaller version would work okay but the larger size looks better.

Monday, May 15, 2006

Let's Take A Break!

I've posted a number of installments and thought I'd stop for a bit to see how they're being received. I note from the photo views in the Gallery that quite a number of 'click's are being counted on the various pictures. However, I don't seem to be getting many comments. So, if you can take a moment, click on the "comment" posting area at the bottom of this post and let me know how you are doing with this project or what you think of it so far.

If you have a question regarding a certain item in a particular installment, leave a comment on that post and I will try and answer your query with a comment in the same area. I've been trying to think of everything I can pass along when I create each new post but I know I leave things out that are important to you so let me know about them. If necessary, we'll go back and review or even redo areas that might be confusing.

Okay....break's over! Let's get back to making chips!

(Ignore that 'Additional Photos" below, there are no more photos with this post.)

To be continued.....

A Hankerchief, Some Burning, and a Left Arm


In this post we're going to do some things a lot of you might not have tried yet. First will be an 'Add-On'. In this case the add-on is a hankerchief the Cook uses to wipe his hands and, no doubt, blow his nose. It's much easier doing an add-on than trying to allow for such details on a solid block. I know...some might say it's cheating. Tough!

We are also going to use a pyrotechnic pen to do some burning. If you don't have one of these pens don't worry..you can get buy without that detail and your carving will look just as good.

Lastly, we are going to carve the left arm and attach it permanently to the body. Did I hear someone cry CHEATING!!! again??? Hey..if you don't like what we're doing here go pester someone else. This is my technique, my carving and my Blog so I'll do it "MY way. I'll explain a little more why I do the arms separate in the Right Arm post.

You will also see photos of me using my Sand-O-Flex Wheel. I use this piece of equipment constantly. I have one wheel set up for my carvings and another with heavier grit paper for metal and other projects. They are invaluable to me.

You can see by the photo above that I have finished carving the boots by completing the soles and adding a few wrinkles.

This is a busy posting which will take you a while to get through. There are some different and possibly difficult steps to accomplish but just take your time and you'll make it through okay. Just remember.....CHEATING IS ALLOWED ON THIS SITE!!!

Someone ask how I come up with my ideas for carvings. Well....I love the Old West! In this particular instance, I like to think I know a lot about Chuckwagons and Cooks as my wife and I own a wagon and we cook out of it a lot. This June 10 & 11 we'll have our wagon at the Echoes of the Trail Cowboy event in Fort Scott, Kansas. The fire will be burning, the coffee hot and there will be biscuits in the Dutch Oven. If you're in the area we'd love to have you stop by.

www.cowboypoetry.com/echoes.htm

To be continued.....

Sunday, May 14, 2006

Vest, Shirt & Apron


We're going to be doing a little more detail work with this installment. Looking at the photo to the left you can see that the front of the body looks pretty well finished. The circle on the apron indicates where the design of the flour sack will go. The vest has two pockets and button holes. No buttons yet as we'll paint those in. The apron has been given folds and creases and if you look close on the right side you will see a patch near the bottom edge of the circle. I've carved in folds and overlaps on the neckerchief.

A word about detail. As our cook is from the Old West, I would suggest you do a little research into the clothing they would have worn back then. There are hundreds of websites out there you can google to see the different types. To me that's half the fun of doing a carving like this. A lot of places will send you a free catalog which is a great thing to have. I subscribe to a ton of magazines on this period that are shredded to pieces by my cutting out photos to paste in my reference books. I have also bought pieces of clothing and other cowboy tack that appear frequently on my pieces. That way I can put them on and see just how they fit in different poses. It's also fun to just put them on and play Cowboy. My horse Boomer loves it when he sees me coming with the saddle, dressed up like 'Gus' McCrae. He knows we're going to have some fun.

To be continued.....

Saturday, May 13, 2006

Cuffs, Legs, Shirts and a Little Bit Of Sanding


It's time to start getting into a little bit of detail. Now don't get too excited.....I said a little bit of detail. We're also going to get the body ready to accept the arms once we get them done. We'll be using a disc-sander. Be careful when using power tools on Basswood as the wood is soft and can disappear at a rapid rate. If you don't have a disc- sander you can still accomplish the task it just won't be as easy. The one I use is a Black&Decker benchtop version that serves me well. Sometimes I wish it was larger but not enough to run out and buy the bigger version.

Don't take any wood off his bum as we're going to do a little Add-On to his right pocket in the next post. You can see by the photo that we've really made a good seperation between the two legs. That long-bladed knife did it's duty and allowed the Cook to keep that deep growl in his voice! He's appreciative of that and might just reward you with an extra biscuit.

Remember...If you have a question regarding this part of the project, drop me a comment by clicking on the "Comments" area at the bottom right of this post.

To be continued......

Wednesday, May 10, 2006

Roughing Out The Legs & Vest


Now that we've got the feet and lower legs established, it's time to open the area between the legs. You can see where I've penciled in the opening up to the bottom of his bum. While I'll use Old Reliable to make the first cuts I'll switch to a knife with a 2 inch blade to get further inside. I also used a small Flex-Cut gouge to widen this area. You can see in the photo that the feet and legs are now clearly indicated but they still lack any detail. That's just as it should be.

One of the biggest mistakes carvers make is the rush to detail. You can't build a house without a firm foundation and carving is no different.

The captions beneath the additional photos associated with this post should explain what I'm doing so I'll sign off and go watch the PBS Special on the Duke and John Ford.

To be continued........

Let's Get Started!

To begin with a word about safety. Make sure you wear a Carving Glove and a Thumb Protector before attempting this project. The last thing I want is for someone to get hurt. A little bit of protection now could save you from a lot of pain and grief later on. Also, this project is not meant for a beginning Carver. My comments are going to be made with the understanding that you already have a solid grasp of the basics of woodcarving. A lot of the techniques I'll use might be new to you but, hopefully, we will work through them.

One more thing before we start. I've never attempted anything like this before so as the saying goes...Be patient with me! If you have a question put it in the Comments section and I'll try and answer it. Also, remember that I'm typing these comments as I'm doing the carving so I'm in the dark as much as you about how this thing will turn out.


Okay! Here's the pattern for the Cook. While the outlines for the Head and Arm are given don't worry about those for the moment. We're only concerned with the body right now. Click on the "Additional Photos" caption at the bottom of this Post and it will take you to the photos associated with this posting. Copy the Pattern photo to your computer and enlarge it to the size indicated. This will give you the templates you'll need but cut the body. Lay it out on your block with the grain running in the direction of the arrows. Cut the Side profile first then the front.

My tools. Yes, that's a box knife! I have used this tool for years to the point that it has become my "Old Reliable"! Everybody thinks I'm nuts for using it and maybe I am. All I know is that it works for me and thats whats most important. I also use the "normal" carving knife when called for so if you have a favorite knife like I do use it. If you prefer to use gouges and chisels then use them. As we go along you'll see me using other tools but, for the moment, I'll start with these.

There are captions under the photos to explain what I'm doing. Again, if you have to ask questions about basic carving techniques this project may be too advanced for you.

To be continued...........


Tuesday, May 02, 2006

Carving the Chuck Wagon Cook - A Little Background


This will be the first project. I choose this character as he is pleasing to a wider variety of viewer or prospective buyer than just a cowboy. Also, as there is a lot of detail on the figure and all his associated cooking gear. This is going to be FUN! You'll learn how to make a real Tin Cup, A Coffee Pot, Dutch Oven with Biscuits and a pot of Beans. We'll create dirt, plant grass, dig a fire hole and build a fire.

First off, let me dispel a myth that seems to be accepted as fact about the Chuck Wagon Cook. Most movies, books or TV show the Cook as a greasy, unkept character most people wouldn't let onto the Ranch property, let alone into the kitchen to cook their food. In reality, a Ranch owner, to ensure he has a happy, well fed crew to do his work, would look for the best cook he could find. The best example of this would be in the movie "The Cowboys" starring John Wayne. Remember when the Duke asks Roscoe Lee Browne, who plays the prospective cook Jededia Nightlinger, what he can cook and he rattles off a list and ends with Apple Pie that would make you "Want to slap your Mama!". I guess because she couldn't even cook that good. So the next time you watch "Monte Walsh" with Tom Selleck, and you see that filthy, disgusting looking Cook, don't believe a word of it!

My First Post


Okay Folks! Let's see if we can bring Western Caricature Carving into the age of the Computers! I had originally thought of doing a book but I think this format is much more user friendly, at least to the person doing the work. I can update it as I go along and be as wordy as I want. I can also post as many photos and other related info, links, etc., as I want without having to worry about the length of a project. Also, it won't cost those interested anything! A free instruction book! Maybe we'll start a trend. So we'll see how it works out. If it does....Great! If it doesn't......no big deal.

So......as soon as I get started on the first project I'll let you know. Should be soon as I already have a few photos to post.

TTYL