Wednesday, December 31, 2014
Thursday, December 11, 2014
The Chief
I still want to do a complete figure using the techniques I've learned with this one Being able to see the spaces or open areas between the various details really adds to the overall appeal of a carving. I have a buffalo skull laying idle on my work bench that was done quite some time back that just might be incorporated into a piece with a full war bonnet. I think that would present a great challenge with a beautiful result. We'll see.
Anyway, hope you like what you see and as always your comments are welcome and appreciated. Lots of photos in the Gallery.
Monday, December 08, 2014
War Bonnet II - Almost Done
Just a few more details to add and he will be finished. The drops from the rosettes! I think he really turned out great and is one of my best pieces.
More photos in the Gallery.
Sunday, December 07, 2014
Building A Canoe - Part 5
I came awful close to tossing that piece of butternut directly in the stove. Please, the next time you see me pick up a piece of that stuff call me immediately to save me from the grief of choosing it again. Aside from that things are starting to show real promise! Hope you agree.
Building A Canoe - Part Five from Out West Woodcarving Videos on Vimeo.
Indian Chief
Started painting him the other day and again this morning. Scratchy throat doesn't make it a very pleasurable experience but he seems to be coming alive while the colors will have to wait till their varnished to really show their true self. Hope you like him so far.
Wednesday, December 03, 2014
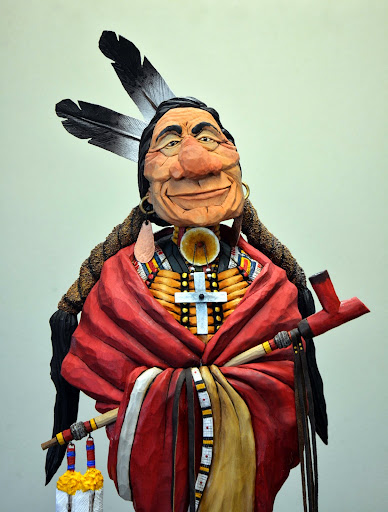
Making A War Bonnet
I've been holding off on putting up a post on this project until I can see if it will actually work. Well, it looks like it will so here's what I've been trying:
For a long time I've been wanting to attempt to make a Native American wearing a war bonnet made with individual feathers, Watching David Lemon's latest sculpture take shape really brought that idea forward to where I got the nerve to try it. You can see David's work here: http://adayinthelifeofalemon.blogspot.com/ So......
I sat down and carved 20 feathers about 5 inches in length out of pretty thin wood. I went ahead and painted them as to do that after they were installed on the headress crown would very difficult if not impossible. I also painted the crown. Once everything was dry and with the help of my trusty sidekick...Judy, we temporarily attached the feathers to the crown with super glue just to hold them in place until I could lock them down with epoxy. This step, one which I thought would be difficult, actually was fairly easy. With all the feathers in place I epoxied them permanently in place using a toothpick to work the glue around the base of each quill. The next step will be modeling the base plumes at the junction of the feather and the red quill wraps. I plan on using acrylic modeling past as this will lock all the feathers permanent to each other.
I've left plenty overlap where the crown meets the head for all the attachments to come...braids, ermine fur strips, etc.
I carved the body of the bust yesterday but it's still up in the air whether I'll use it or go for a complete figure.
To sum it all up .... I like it but do realize that the feathers are way out of scale which I why I only used 20 feathers when, to be correct I should have used 32. But it is a semi-caricature so I guess I can get away with it. Now that I know it can be done maybe I'll do a more realistic one later.
Monday, December 01, 2014
Wednesday, November 26, 2014
Lash LaRue
I've been working on this one for quite sometime and finally put the finishing touches on it today. I had thought all that black would just overpower the figure but I think it looks pretty good. I did do a little dry brushing to bring out the details and wrinkles a little. I wish I could have done a better job on the whip but other than actually trying to weave one that would be in scale would have just been impossible, especially considering the shape of my sight. He stands about 12" high with the base. Maybe someday I'll do his side-kick Fuzzy to complete the duo but it will have to wait till another day.
More photos in the Gallery and your comments are appreciated as always.
Wednesday, November 19, 2014
WIlliam F. Cody - "Buffalo Bill"
I also use this one as part of my demonstration at the Dayton show and finally finished painting him up yesterday. I think he turned out really well. Hope you like him and there are more photos in the Gallery.
Monday, November 17, 2014
Sunday, November 16, 2014
Saturday, November 15, 2014
Building A Canoe - Part One
It's been a while since I did a project like this and coming across a photo of a sculpture we had seen a couple years ago, I thought it would be neat to do another and give you a chance to see how I did it.
Should you want that Artists Manikan here's the link:http://www.amazon.com/gp/product/B000SSVGZ2/ref=oh_aui_detailpage_o04_s00?ie=UTF8&psc=1
And here is Part One of this video series.
Building A Canoe - Part 1 from Out West Woodcarving Videos on Vimeo.
Friday, November 14, 2014
The Trail Boss
This is the piece I used during my demonstration on painting at the Dayton, Ohio show last weekend. I was a little worried about whether the limited amount of paint I was able to apply during the allotted hour I was given would carry over and match the other once I could set down in the shop and finish it. I did have to repaint the shirt and neckerchief but the rest turned out fine. I did add a pair of glasses as it just needed something to make it complete.
Hope you like it and there are additional photos on the blog. Oh....I was told that a DVD will soon be available of all the demonstrations given at the show so if it shows up I'll try and post at least my portion.
As always, comments welcome and appreciated.
Hope you like it and there are additional photos on the blog. Oh....I was told that a DVD will soon be available of all the demonstrations given at the show so if it shows up I'll try and post at least my portion.
As always, comments welcome and appreciated.
Sunday, October 26, 2014
Weary Willie
Here's my contribution to the "Silent Auction" portion of the Artistry in Wood show in Dayton, Ohio beginning on November 8. The Dayton group use this event to raise money for their charities and group. This years theme was characters related to a Circus. My first thought when thinking about the Big Top was the clown character created by Emmet Kelly. I can certainly remember him growing up. Anyway, I hope it sells for a nice sum so the Dayton club can benefit from it. Hope you like it too. You might even want to see if they take phone in bids!!
Friday, October 24, 2014
"You've Got To Be Kidding!"
Well, here it is. This piece has been occupying my time for the past couple of months. Not that it took me that long to complete. Doing some of these projects gets me so involved with details that the entire project grinds to a halt while I try to figure out just how to do things. I will say I think it turned out really well. I wanted to convey the thought of a cowboy facing his assigned mount for the day. It's clear from the title that his day is starting off on a bad note. Oh.....one thing about titles...I've noted that people passing our display or visiting the Gallery almost never look at the title of a piece. To me that's a real shame as it's the title that explains the piece. Sure, sometimes the action will do that but not always. On my pieces and no doubt the pieces of others, that title conveys just what I or they were thinking as we created them. So, the next time you pass a carving or sculpture you admire take a moment and read the nameplate to see exactly what the artist is trying to show and say.
This is a large piece, standing about 16" with the base. I spent about as much time on the saddle as I did the figure as I wanted to get it right. I have an old antique saddle in the Gallery which I brought over to use as a reference to ensure that all the details were correct. There is one very small piece missing but I won't tell you what it is. If you're familiar with saddles you can probably figure that one out. Hopefully, you won't find another. I made the cinch out of a piece of tupelo which I steamed and bent over the seat. The rear cinch is made from leather as it was just too small to make from wood and stand up to the handling that it would face over time. Besides...it looks good swinging free back there. The cinch straps and ties are also leather as is the bridle and reins in his other hand. The horses bit is made from copper and the lariat from twisted wire.
I spent a longer time painting on this piece as I wanted the colors to show a larger degree of wear. I think the chaps are really a work unto themselves and I'm proud of the job I did there. It might not show but there are lots of layers in the coloring. I wanted a red shirt but settled for a rusty color to dilute it enough so it wouldn't overpower the rest of the piece. It balanced out just right. Looking at the entire piece all the colors work well together and have a washed out look to them as if they've been worn for quite a while and still carry a little of the prairie dust. Neat.
This will be my main piece at the upcoming show in Dayton. I've ordered a rotating turntable which I hope gets here in time so the carving can be seen completely as the viewers pass by. Hopefully, one of them will have a few extra greenbacks in their wallet and want to take it home. Make that a lot of extra greenbacks!!
Lots of photos in the Gallery and I'm looking forward to your comments.
Bright Feather
First, my apologies to Mr. David Lemon for using his sculpture "Sweet Grass" as a reference for this figure. About two years ago Judy and I made a trip to Ennis, Montana to meet David and to pick up "Sweet Grass", our first bronze. As you can see from the photo it's one of the most beautiful and impressive pieces of art we've come across. We think that David is one of the most talented sculptors working today. What's really great about him is his willingness to share his talents and secrets with the rest of us through his Blog. If you like sculpture, as I'm sure most of you reading this do, you owe it to yourself to spend some time watching him create his fantastic pieces.
As for this figure, doing a realistic piece has always interested me and one of these days I'm going to complete one. Unfortunately, I'm not there yet. While I think I have the clothing details down to a point that I'm satisfied with it's the facial features that still elude me. But I think I know which areas I need to work on. Like everything associated with this craft it takes a lot of practice to get to where you want to go.
There are more photos in the Gallery and I look forward to your
comments. - Here is David Lemon's "Sweet Grass" a the link to his Blog:
http://adayinthelifeofalemon.blogspot.com/
All Hat, No Cattle!
The title might be familiar but the character is new. Not much to say about this one other than I did a little different application of the neckerchief. The busts I'm doing now are a bit larger than most...standing about 11" tall with the base. I think they make a much more pleasing presentation. Hope you like him.
Mean Mr. Wilson
I had originally planned on this as a full figure but after doing a Bottle Stopper and a smaller bust of the same subject I was burnt out on the character. To get him off the work bench I decided to finish him as a larger sized bust. Of course it's Jack Palance in the guise of Mr. Wilson, the gunfighter hired to clean out the nesters in the movie Shane. I think he'll be more easily identified once he's painted. Hope you like him even though he doesn't deserve it.
Wednesday, October 15, 2014
Friday, October 10, 2014
Dayton Demo
Last year I was ask by the Dayton Woodcarving group if I would do another demonstration. I had done one years ago on carving a horse that was received pretty well so I agreed to do another. As I'm continually asked about painting I thought a good subject of it would be how I go about painting a figure once it's carved. The photo to the left is the figure I'll attempt to do. I choose a bust as ther is just no way I could do a complete figure in the allotted time. This is a good sized piece..about 12" including the base so it should be easy to see just what I'm doing...at least I hope so. So, if you're at the show I hope you pull up a chair and tax my old mind with lots of questions. It will be on Sunday at 1:30 I think.
See you there?
"Where's The Beef?" Finished!
Okay....Here are the final photos of the finished piece. I think it turned out pretty well. Can't really see where I could have made it better. Of course things will start to show up the longer I look at it so I hope it leaves the inventory soon. Like Charlie Russell said..."I raised my kids to leave home!" and I have the same belief. Anway, I hope you enjoyed the trip in making this little gem and should you have any comments I always enjoy reading them.
Don't really know whats on tap for the next series but I'll try to think of something interesting.
Thursday, October 09, 2014
"Where's The Beef?" Part 8 - Wrapping Things Up!
With this video we come to the conclusion of this series. Hope you enjoyed it. I will post the final photos tomorrow.
Where's the Beef - Part 8 - Wrapping Thins Up! from Out West Woodcarving Videos on Vimeo.
Monday, October 06, 2014
Tuesday, September 09, 2014
Monday, September 08, 2014
Friday, September 05, 2014
Thursday, August 28, 2014
It's Throw-Back Thursday!
Tuesday, August 26, 2014
Where's The Beef?
Here's my latest. Seems this poor fella was getting ready to sink his choppers into that big T-bone only to end up with Beans and Biscuits! This one stands about 10-12 Inches tall with the walnut base. Ought to be pretty neat once it's painted. I still have to locate material for the beans. While I've used mustard seeds in the past they would be too small for this piece. I'm thinking either buckshot or BB's. Was going to name it Biscuits, Beans, and Bacon but was worried that some Muslim would have been offended. Yeah...right!
The little fork was the weakest point of the piece so I reinforced it was a metal rod at the bend. Now it's probably the strongest! I carved the fork then cut it in two. Snipping off the head of a wire brad and bending it to match the forks shape I drilled matching holes in each piece and glued it together. It will take a determined effort for someone to break it.
Hope you like him and there are some more photos in the Gallery. Next up? A wrangler carrying a saddle!
Saturday, August 23, 2014
Yellow Hawk
Here's a small one, standing about 10" with the base. Just a quickie but I thought I'd show it off. Really bright colors and I might darken up his skin tones a bit. No more photos but your comments are always welcome.
He Looks Like a Good One!
I finished this one last week so I guess it's time I put him up for inspection. He's a good sized piece...standing about 22" tall with the base. I really like the coloring. That blue shirt shows lots of use which is as it should be. The same goes for the gloves. I do see some areas for improvement after looking at the photos so have made a note of those areas.
-
I want to say one thing about the lariat that I think might be of use to those of you who might want to include this detail in one of your pieces. Even though we might work in caricature it's important to still follow some rules to make our carvings correct. The other day I saw a carving of a Cowboy holding a lariet which looked more like a Piggin String than a lasso. A Piggin String is what is used to tie the calfs feet together during Rodeo roping competitions. It's about 6' feet in length. The normal lariat runs from 28' to 32' in length. Some are even longer. When I make my version I first determine the scale by measuring my figure and then scaling the wire length to match a 6' cowboy. In the case of this figure the length came to about 10 feet. That might seem like a lot but after making the loop and coiling it through his hand it looks just as it should. So, when he throws that rope around that rangy cayuse he shouldn't come up short.
-
I hope you like him as I do and there are more photos in the Gallery. As always, your comments are welcome and appreciated.
-
I want to say one thing about the lariat that I think might be of use to those of you who might want to include this detail in one of your pieces. Even though we might work in caricature it's important to still follow some rules to make our carvings correct. The other day I saw a carving of a Cowboy holding a lariet which looked more like a Piggin String than a lasso. A Piggin String is what is used to tie the calfs feet together during Rodeo roping competitions. It's about 6' feet in length. The normal lariat runs from 28' to 32' in length. Some are even longer. When I make my version I first determine the scale by measuring my figure and then scaling the wire length to match a 6' cowboy. In the case of this figure the length came to about 10 feet. That might seem like a lot but after making the loop and coiling it through his hand it looks just as it should. So, when he throws that rope around that rangy cayuse he shouldn't come up short.
-
I hope you like him as I do and there are more photos in the Gallery. As always, your comments are welcome and appreciated.
Saturday, August 02, 2014
Apache - All Done
Finished up the final detailing on this guy. Turned out pretty well but sure was a lot of painting! Hope you like him. More photos in the Gallery and comments always welcome.
Sunday, July 27, 2014
Apache - Read To Paint
Put the final knife strokes to this one this morning so he's destined for the paint table. Still have to do some more detail on the lance and shield, i.e. feathers, etc. but it's basically finished. Should be quiet colorful once it's completed. Also, was lucky enough to have sold it already to a collector who's been waiting for an Apache carving.
The base is out of red oak and the lance and shield are pegged to the carving and the base. Hope you like him and your comments are welcome as always.
Thursday, July 24, 2014
Cowboy
This one is all finished but the painting. He's a big one...standing about 22" tall. He will be holding a lariat loop in one hand and the coiled excess in the other. Should make for an interesting piece. Will hopefully use him in a rather big experiment should things work out as I hope. If not he will be a nice addition to someones collection. No additional photos on him...just these two. Comments always welcome.
Apache
Here's one I've been working on over the past couple of days. So far he's looking pretty good. That base is not the one that will be on the finished article....just something I had handy to make the thing look a little better. He should be pretty colorful once completed. No additional photos this time but your comments are welcome as always.
Sunday, June 29, 2014
Custer
I've done this one in smaller versions in the past so thought I would try a larger one. Also, it gave me a change to add a couple extra details, one that I wasn't aware of.
When doing some research for this one I noted that in some photos of him there appeared to be a badge of some kind pinned to his neck scarf. I had thought maybe it was his Medal of Honor but when checking the medal issued at that time it was clear it wasn't that. I sent a note to my good friend and sculptor David Lemon and he informed me of something that I didn't know. Custer had his own medal! I won't go into just what that is but here's a very interesting link about it:
http://www.lacwrt.org/docs/The%20Custer%20Badge.pdf
Due to the size of the piece and my feeble eyesight, I wasn't able to add the smallest details to the medal but I think there's enough to indicate just what it is and you have to admit it really adds a neat tough to the piece.
I also took the liberty of adding the leather strap across the chest just to break up the large expanse of yellow/tan leather. It also creates just one more details to add interest to the piece. While a lot of the painting of him show him wearing a light tan hat in looking at the photos it looks much darker than that so I colored it a dark blue with a gray piping edge and hat band which would more closely match the issued uniforms they were issued. Granted, he pretty much wore what he wanted and even designed his own but that blue hat again makes it that much more interesting. This bust stands a little under 12" with the walnut base, a nice size that will easily stand out from the rest.
There are more photos in the Gallery along with a couple of unpainted ones showing his ears which I re-carved to more closely follow the photos. I hope you like this one as I certainly do and I look forward to your comments as I always do.
Thursday, June 12, 2014
"MEDIC!!"
Here's a little quickie I finished yesterday. While I've done this character a couple of times in the past this time I made his situation just a little more intense. The arrow is a piece of 1/8"dowel with plastic feathers and a hammered copper arrowhead. To accommodate the arrowhead and feathers I burnt two slots for the fletching and a completely burnt through slot for the arrowhead. I wrapped thread around the point to keep it in place and also to give the look of realism.
Not really much to add about the figure itself other than his prognosis doesn't look to good. Of course, like all cartoon characters, no one ever seems to succumb to their injuries so there might still be some hope. This is the only photo. Look forward to your comments.
Wednesday, June 11, 2014
A Good Trade
At this years Rendezvous, this Mountain man managed to swap a few beaver pelts for a pretty nice blanket. It will no doubt come in handy on cold winter nights high in the Rockies.
I think Beaded Blanket strips are one of the most colorful items associated with Native American crafts. I an only imagine how much time is spent making one of these and how proud one would be to wear one.
With the base this piece stands over 12" tall. The base is walnut. One thing about bases......when making a base a lot of us make the mistake of picking a soft wood like pine when we should have reached for a nice piece of oak, walnut or even better, cherry. I realize that these are much more expensive than a pine board you can pick up down at the home center. Unfortuately, that pine board reacts to stain in such a way that the finished article appears blotchy and unprofessional. My advice is to go ahead and fork over the extra money and purchase a nice piece of hardwood. Your carvings and hard work deserve it.
A few more photos in the gallery and I look forward to your comments.
Saturday, May 31, 2014
The Captain's Coat
Believe it or not, I actually finished something! Believe me it wasn't easy...working between all the chores around the place and, the relocationof our oldest son's family into their new place next door, and the visit by our grandsons for the past week, there's not much free time to set down to whittle and paint. But, I thing the effort paid off with a really nice and colorful piece.
I don't know if you all have been following the "Turn" series presently showing on the AMC channel about General Washington's spy network, it sure sparked my interest. I had just recently read BrianKilmead's book "The Secret Six" which was also about these same events but seeing the many uniforms whetted my appetite to try something along those lines. Granted, my piece sort of stretches the facts a bit by giving a plains Indian the coat of a revolutionary officer but, hey! It could have happened!
Anyway, while I've done similar carvings before I tried to make this one a little more realistic, at least in the face. I added that knife and sheath to fill up the area on the breast plate. It also creates a bit of interest and addes another element of color. The carving, including the base stands about 12" tall. Brass nails were used for the buttons.
Hope you like it and there are more photos in the gallery and I look forward to your comments.
Sunday, May 25, 2014
"Where'd They Go?"
First off we hope you're all having a great Memorial Day, celebrating the true meaning of what it stands for. Being a vet myself it seems that with each passing year I become more aware of the sacrifices that have been made by those who've passed before and by those still with us and especially those in uniform. Most will probably blow the whole thing off with BBQ and boat rides but to me it's my Great Grandfathers, who fought in the Civil War, my Grandfather, who fought in the Spanish American War, my Dad who served in the National Guard during WWII, myself who did a stint with the US Army and our sons who both served and participated in the Desert Storm campaign while in the US Air Force and the US Army. Proud? You betcha!
As for what else we've been up to that has prevented us from our usual postings, it's a house full of in-laws and grand kids and a Spring full of chores. We did manage to break away the other day to pay a visit to the Cowboy Hall of Fame in OKC on our way to pickup our grandsons who are up for a weeks visit. While the place was full of bare walls while they gear up for the upcoming Prix de West show it was still enjoyable to wander and gaze at the many things on display that we've seen many times before. Also, we snuck down to check out the Chuck Wagons setting up for the big Memorial Day Kids Fest which started Saturday. Having a wagon ourselves it's great to see and talk about what's been going on with the wagon competitions around the country. Then it was off to the Stockyards to check out the Western stores and have a steak at the Cattleman's Steak House before heading down to pick up the boys.
Here are a couple of photos of that short trip:
That's Judy standing beneath Wilson Hurley's Yellowstone triptych in the great hall of the museum. We were lucky enough to attend the banquet there honoring the annual Rodeo inductees a few years back where one of my pieces was auctioned off to raise funds for the museum. Quite an honor.
So, that's what's been going on around and about our place. While we certainly haven't forgotten about those of you who follow these ramblings, time is getting short so we have to take time to work in the other important things in our remaining years.
Happy Memorial Day!
Tuesday, May 06, 2014
Monday, April 28, 2014
Where's Waldo And Waldette?
We're still here. But that photo over there on the left will give you just one of the many reasons we haven't posted for a while. With spring weather finally here we have a ton of projects around our place to work on as we're sure most of you do too. With close to 60 acres to take care of it's a struggle to keep up with fixing fence, cleaning up the fallen brush not to mention the mowing. Then there's dodging the tornadoes and severe weather fronts that roll through Oklahoma from April till June. Just over the past week we lost two large trees to the winds which need to be cut up, brush burned, and wood hauled off to be split. That's what we did today.
Anyway, one of these days we'll be back in the shop cranking out the videos...at least we hope so.
Monday, April 14, 2014
Sunday, April 13, 2014
"You Don't Know Jack!"
Actually, you probably do after all the posts lately about him. Here is the other, larger head of Mr. Palance mounted as a bust. I changed the color of his neckerchief a bit by adding some iridescent light green to the black. I also painted the back of his vest with iridescent burnt orange to give the figure a bit more color. I think the colors balance out really well. With a little bit of dry brushing with a light tan color to highlight the wrinkles and folds of the vest the figure makes a pretty good representation of the dasterdly Mr. Wilson from Cheyenne who will soon meet with a well deserved end.
To gain a little more information about the figures in this story I bought the book "Shane" by Jack Schaefer. I was surprised at just how close the movie follows the story. Hardly any liberties were taken and all the events portrayed in the movie were straight out of the book. One thing that was different was that Shane showed up dressed in black not buckskins. A good, quick read even if you know how the tale will end. Another great source for the movie can be found on Wikipedia which has some really interesting facts about the stars. I knew Alan Ladd was short but didn't know he was afraid of guns! Funny for a guy who appeared in so many movies featuring weapons. And the bit about Jack Palance and horses is just too funny! Here's the link: http://en.wikipedia.org/wiki/Shane_(film)#Cast
A few more photos in the Gallery and comments always welcome and appreciated.
Wednesday, April 09, 2014
Monday, April 07, 2014
Let's Have An Auction!!!
Good Luck!!
Iron Shirt - Finished
Here he is....all painted up and ready to make his debut! I had my doubts for a while as to whether he would turn out as nice as I originally planned but glad to say he made the grade. The colors really set him off and the feathers and the knife seem to balance the entire figure. It would have been nice to feature the iron breast plate more but it's there and that's what counts. He stands about 13" with the base I think. There are a lot more photos in the Gallery and I look forward to your comments.
Friday, April 04, 2014
Jack Palance - Shane - Part 7
Is it the toothy smile or the cigarette? How about both?
Jack Palance, Shane Part 7 from Out West Woodcarving Videos on Vimeo.
Thursday, April 03, 2014
Jack Palace - Shane - Part 6
Okay.....once more with the ears.
Jack Palance, Shane Video-Part 6 from Out West Woodcarving Videos on Vimeo.
Wednesday, April 02, 2014
Jack Palance - Shane - Part 5
OOPS! Don't know what happened but we lost almost all of this video! Oh well, I think the last few minutes will show what we were doing and I'll make a point of going over it again in the next one. Anyway, here is the closing segment on carving the ears.
Jack Palance, Shane Part 5 from Out West Woodcarving Videos on Vimeo.
Sunday, March 30, 2014
Thursday, March 27, 2014
Tuesday, March 25, 2014
Jack Palance - Shane - Part 1
Here's the first post on our next project. We filmed it outside while we were burning brush on our Son's place next door and as it was kind of windy at times the audio gets interrupted occasionally. Whatever, I think this will be a fun project and give us a figure that will be a hit with anyone who has seen the movie Shane or is a fan of Jack.
I will place the pattern for the head in a gallery folder along with the reference photos.
Jack Palance, Shane Video from Out West Woodcarving Videos on Vimeo.
Tuesday, March 18, 2014
Iron Shirt
Here's the beginning of a new Native American bust. The plan is to have him not only wearing a highly decorated coat but also a Conquistador's breast armor underneath. Sounds interesting? I started the head this past Saturday while at a regional Carve-In we held down at the local Senior Center. I like the kind of arrogant look he has about him. The photo is not the greatest as I took it with my phone. Again, the base is an old one so that will change. Hopefully, will get him pretty well fleshed out before the Kansas City show coming up this weekend. Will be glad to see that bunch again as we haven't been able to attend the last two. It's always been a great gathering and show so we're looking forward to the trip.
Anyway, another is in the works and the creation process continues.
Monday, March 17, 2014
Red Horse III
I gave this one it's final touch-up this morning so he's on his way to make a debut at the Kansas City show this coming weekend. He's a tall one....topping out at approximately 24". One thing I learned while doing this one...it's a lot easier on my old eyes painting beading in a larger scale. This just might be the direction any future carvings will be headed. Besides, a larger carving just attracts that much more attention. It's that old Elephant theory again.
As I pretty well explained what was going on in the last post I won't go into it much here. I added some leather strips to the top of his pipe and also two strings with wooden beads to his pipe bag. So, along with his earrings and his feathers there is a lot of movement should a breeze happen to pass by. I've really grown to like that aspect of the pieces I've been doing lately as it just brings the carving to life just a little more while also giving me a chance to try out and do new things. After all, carving is a creative thing, not something that one should just do over and over. God makes sure that every snowflake is just a little different and that's the way I want my carvings to be......maybe similar but definitely a little different.
Anyway, I hope you like this new piece and will look forward to your comments as I always do. Lots of photos in the Gallery.
Saturday, March 08, 2014
Red Horse II - Underconstruction
Finished up with the carving on this one this morning and have started adding all the details. Still have to flesh out the pipe but once that's done the carving should be pretty well finished. After that it's on to the paint table and the real fun.
I made his earrings out of brass rod and the dangling bits are from pounded cooper which will be painted. The cross on his chest, which represents the four directions, is just two pieces of thin wood overlapped and glued to a 1/8" dowel. The braids are held in place with 16 penny nails with the heads clipped off and epoxied in place...probably the strongest part of the carving. I haven't really given much thought to the beading patterns but it won't be long before I get the books out and do a little research. I did do a Google search for pipe bags and there are some really nice ideas there.
Still no additional photos in the Gallery. Snapped this one with my phone.
Wednesday, March 05, 2014
Red Horse II - Under Construction
Finished up the body today and then made a new base. As this piece is approximately 24" tall and rather top heavy I made the base in two pieces to give it a footprint large enough to keep it upright. I epoxied a piece of 1/2" steel all-thread into the base of the piece so it could be firmly bolted to the base. The base is walnut.
Tomorrow I'll start with the hair braids and then move on to the feathers and the smaller details. This one should really be a looker once completed. Lots of color.
Also, I took the photo with my phone. It's not as good as my Nikon but then it's also not to bad!
Tomorrow I'll start with the hair braids and then move on to the feathers and the smaller details. This one should really be a looker once completed. Lots of color.
Also, I took the photo with my phone. It's not as good as my Nikon but then it's also not to bad!
Tuesday, March 04, 2014
Just A Little Off The Top! - Finished!
Disaster! Why me? Why me? I blame it on the cold weather or my not warming up the shop before applying the mirror as it cracked! You know what they say about breaking a mirror so I don't know what the future of this piece will be but, so far, it's not looking good.
I waited to the very last minute to add the mirror as I knew it would be the most important step to the piece. I think the reason it broke was because the heat from the epoxy going off and the coldness of the shop just didn't cooperate with the glass. If you were in a 50 mile range of my shop you probably heard the scream at about 8:30 yesterday. I haven't really decided on whether to try and remove and replace the mirror. In a way it kind of adds to the piece. Fishing out the broken pieces could easily destroy the mirror frame. Will have to think about it for a while.
Aside from broken glass, the piece really turned out well. I used trimmings from a paint brush and some horse hair to make the clippings. Sprinkled them on while the first coat of varnish was wet and then came back and sprayed on several additional coats to lock them in place. I did this on a bottle stopper I made quite a while back and it worked out pretty good so doing it on a larger scale was fun.
Anyway, I hope you like him...even with his broken mirror. There are more photos in the Gallery and I look forward to your comments and sympathy!
Red Horse II - Under Construction!
Here's the beginning of my next project. It's will be quite a large carving...already testing the limits of my Band-saw not to mention my right arm! Excluding the head the body blank took an entire 4" x10"x18" block of that good Heineke wood. He will be holding a pipe and that's his pipe bag that hangs from his arm. It will have fringe and beaded designs. I'm not sure I'll use that base as it was just one I had handy so I could take the photo. Worked on it yesterday afternoon and it about wore me out and that was using the reciprocal handle on my Fordum. That is one great tool for removing large amounts of wood fast but it's still quite tiring.
Anyway, thought you might like an early peek atwhats going on down the hill. Sure beats shoveling snow!! There are no more photos in the gallery yet. Will keep you up to date as it progresses.
Saturday, March 01, 2014
Woodcarvings By Bob!
I'm sure a number of you have been fortunate enough to have seen Bob Cisko's Snowmen. For those of you who haven't you're really missing a clever and well done bunch of winter wonders. They might not be Cowboys or Indians but they come as a welcome relief to the myriad of Santa carvings that has been the norm for so long. The thing that sets these carvings apart is that they are so unique and adorable. You just can't seem not to admire and smile when seeing them. Bob says people can't seem to get enough of them and I can certainly see why.
While the poses of the little figures are so well done on their own the painting is something to really admire. It's just so clean and neat and the color choices really compliment each other. He's clearly struck gold with them and I can hardly wait till one shows up toting a sidearm and a wearing a Stetson.
Bob doesn't have a website but he does have a Face Book Page: Woodcarvings By Bob! I highly recommend you take a moment and check out these little wonders along with some other really good looking carvings.
- Well Done Bob!
Wednesday, February 26, 2014
Just A Little Off The Top!
The carving part of this piece was finished up today with the installation of the mirror. Judy and I spent some time in the WalMart makeup section yesterday looking for a ladies compact that I could remove the mirror from to allow him to see his reflection. I think it's pretty clear that the barber must have been hard of hearing or, like all barbers when presented with a healthy head of hair, kind of went wild with the clippers. It will be fun painting this poor soul and also adding the hair clippings on the cape around his shoulders. It should be a pretty neat piece once completed.
Lots of photos in the Gallery and I'll look forward to your comments as I always do.
Monday, February 24, 2014
Old Reliable - It's Care And Feeding
Old Reliable from Out West Woodcarving Videos on Vimeo.
As I am always getting questions about this tool I thought I would do a little video on just how I go about getting it ready to do it's wonders. Hopefully, this will answer all your questions should you have any.
Wednesday, February 05, 2014
Fence Work -Finished!
I finished this one up this morning with the help of Judy who was kind enough to construct the barbed wire while I put the final touches to the overall scene. This is a fairly large piece, measuring just about 22 inches including the base. I got the idea for it from a painting by Bruce Greene. Of course, while borrowing the paintings pose, I added my own embellishments and changes to make it unique from the other.
I was a little hesitant to add actual barbed wire to the piece for fear that someone would poke themselves, however it just wouldn't have looked correct with smooth wire. Barb-less wire is used on horse ranches as horses don't lean on the fence like cattle and if you've ever seen the damage barbed wire can do to a horse should they run or get tangled into it you can understand it's use. But in this case I stuck with the barbed version.
The Del Monte sliced peaches emblem is painted directly on the can and it's filled with staples. The fence post is from an old post I found on our property. I weathered it a little more than it originally was.
All in all I'm quite pleased with the way this one turned out. The Cowboy certainly appears comfortable with his work although I'm sure he'd much rather be setting in the saddle, out herding cattle. People ask why I always put a smoke in the mouth of my figures. Well, back then just about all of them lit up when they had the chance. The tag of his makins pouch is hanging from his waistcoat pocket.
There are quite a few photos in the Gallery and I look forward to your comments.
Subscribe to:
Posts (Atom)