Thursday, December 08, 2016

Spotted Elk

Here's another that's been setting on the bench for quite a while.  Except for the completion of the lance and the addition of some feathers  he's complete.  Unfortunately, him and Quint seem to have developed an attachment and just can't bring themselves to migrate over to the paint area.  

This one also stands around 12" tall with the walnut base and as most of my Indians should be pretty colorful once painted.  I really like doing these busts, especially with the addition of the shields and other attachments.  The sky is the limit with how they can be painted and the result is always striking.  

Again, I look forward to your comments.


Quint

I might have posted a photo of this piece on Face Book but, as he's still setting on the work bench in his raw state maybe posting it here will get me out of my rut and get him painted.

He measures around 10-12 inches with the base and once painted should really be a nice one.  I did a little extra detail on his watch chain by adding a fob at the button-hole connection.

As you've probably noticed, my posts have been kind of rare lately.  Hopefully, once the year turns the urge to produce and publish will return.  In the meantime, I hope you like this cowpoke and I'll look forward to your comments as I always do.

Tuesday, October 18, 2016

Making a Bear Claw Necklace - Part 8


Part 8 from Out West Woodcarving Videos on Vimeo.

Thursday, September 15, 2016

Pistol Pete

Here's Pistol Pete, the Oklahoma State University Cowboys mascot!  While he doesn't look much like the actual historical figure he does instill a small amount of fear in the opposing team. Go Pokes!

Thursday, September 08, 2016

Dayton Woodcarving Show Report

Well, we had some doubt about the show considering it's move to Wilmington, OH and the change in dates, however, for us at least, things worked out better than expected.  I managed to Ace the competition events I entered and our sales were better than any previous show.  Granted, attendance was down a bit and there were a number of carvers who failed to show up.  But, considering it was the
Labor Day weekend that's understandable.  For us?  We ain't complaining and will be back next year.  Rumor has it that the dates will be moved back to November while the show will still be held in Wilmington.

The convention site was great ...BIG! And the lighting was really good compared to the old place. We had brought along some lights to brighten up our display but really didn't need them.  With the hotel and a good
restaurant in the same complex you really can't beat the convenience.  And....after routing ourselves through Louisville and Cincinnati we found a better way to get home which was much easier on our frayed nerves from the drive up.  We left the hotel at 5am and pulled into our driveway at 4pm.

As for competition,  we only competed in two categories:  Single figures over 15 inches and the Bust category. The "Buffalo Girl" took 1st and won the overall Caricature Category ribbon...The "Montana Buckaroo" took 2nd.  "Touch the Stars" took first in Busts followed up by "Friend and Foe" for 2nd.  "The Breed" pulled in a large amount for the Clubs charity.  To top it off all those figures left the reservation to new homes.

So in sum, we had a great trip, hooked up with a lot of old friends, and managed to come back home with only half of what we left with.

Tuesday, August 30, 2016

The Breed

This will be my "Silent Auction" piece for the Dayton Woodcarving Show coming up this weekend.  With the walnut base it's about 11" tall.   He's off the reservation and cooling his moccasins somewhere on the beach from the reflection on his glasses.   I've always wanted to do a good pair of mirrored sunglasses and I think I finally found the secret.  As it would be hard to describe without writing a big chapter I'll save it and do it in a video.

I hope you like him and if you're in Ohio for the show he'll be setting on the table for a closer look.  You might even want to make a bid.  It goes to a good cause.  

Monday, August 22, 2016

Big Bear

Here's the last one I'll be able to finish before the trip to Ohio for the Dayton Ohio Artistry in Wood show.

Big Bear stands at just under 18" with the oak base so he's a pretty impressive Drummer heading off to the big Pow Wow.   I did a lot of paint mixing to achieve the colors of the blanket and shirt.  Some Red in with the Midnight Blue for the blanket and a little Midnight Blue with Green for the shirt.  This is fun to do but make sure you remember the color ratios in case your need some later for a touch-up.   I explained the drum construction in the earlier post so won't repeat it here. His earrings are made from aluminum wire left natural for a silver look.

I really like this piece as the character has a relaxed regal look about him.  Clearly, he must be the head Drummer and possibly even the lead singer.  I guess we'll just have to use our imagination to figure out which.

Again, as Google has did a number on my photo posting this is the only photo of the piece.   As always, I will look forward to your comments.

Monday, August 15, 2016

Big Bear

Here's a new one I just finished carving Friday.  Hopefully, I can get him finished up before the show in Ohio next month.

With the base he stands approximately 18" and is quite an impressive piece, especially once he's got some color to him.  I'm sure the main feature on him will be the drum.  I made it just like a real one with a piece of leather stretched over a wooden frame and tied in the back.  I did this by drawing out the leathers shape on a chammy, allowing lots of length to the
tie strips, soaking it and having Judy hold the wooden frame in place while I pulled, stretched, and tied the matching leather strip on the other side.  Believe me...it takes two people to do this.
 Once dry the leather is nice and tight and presents a nice surface to paint on.  I outlined the design with a gel pen then painted in the colors.  Lastly I use some white on a dry brush to indicate wear in the middle of the drum head where the drum sticks would hit. 

As Google has did a number and discontinued the Picasa site where I had all my albums I've decided to only post photos on the actual Blog post vs. in a Gallery album.  Hopefully they will eventually fix the problems and I can resume posting more photos.  As the videos are hosted on Vimeo they are not affected in any way. 

So, I hope you like this fella and will look forward to your comments as I always do. 

Saturday, July 30, 2016

Buffalo Girl - Finished

All done and she turned out great.  I was kind of bleary eyed painting all the beading but it really sets off the piece as does the Buffalo skull.   I decided not to paint the upper part of the dress the darker color as it would have detracted from the overall piece.   I was a little worried about mounting the skull to the figure but putting dowel from the back of it into the body locked it in place securely.  There are lots of photos in the Gallery and I will look forward to your comments as I always do.


Note:  As I mentioned earlier, Google is no longer supporting Picasa but now is using Google Plus as the host for photos.  Picasa will remain it's just that it will no longer be updated.  All my photos are already on Google Plus so for ease of operations I'm going to just let things stay the same for the time being.  

Sunday, July 24, 2016

Buffalo Skull

Spent the morning painting the Buffalo Skull for my new piece.  Looks pretty good although the photo really doesn't show all the colors used.  Before starting I checked the skull hanging in the Gallery to make sure I indicated all the major skull details, i.e., plates, nerve holes, etc. As that skull was bleached I did a little research to capture the true colors of a naturally sun bleached product.

I started out by removing the horn caps and then painting the entire skull a light gray (mudstone) followed by yellow ocher highlights, followed by brown (asphaltum) and ending with white on the parts that would be mostly exposed to the sun.  I then used straight black for the eye sockets with a little white on the outer edges.  For the horn caps I used black and then dry-brushed on some white highlights which really set off the horns texture.  Once everything has a chance to dry I'll paint on the ceremonial decoration but not too much as I don't want to overdo it.

So far so good!!


Saturday, July 23, 2016

Buffalo Girl

I've been working on this one for the past 6 or 7 months.  Once it's painted I think it will be one of the best so far even though, after taking the photos, I noticed a couple areas that need to be corrected.  With the walnut base she will stand about 20" tall.  An impressive piece.

She's a Cheyenne girl, preparing for the Call of the Herd dance.  I plan on painting a few ceremonial symbols on the skull to carry that theme.  She has her skinning knife on her belt and will be ready to follow the hunters once the herd is located.  While there is quite a bit of beaded decoration on her dress and more will be added once I start painting her, I added a role of Elk teeth above the strip of
beads on her chest.  I made those with some 3/16th' dowel and inset them into the wood.   The earrings, choker disk and hair feather disk are made from hammered galvanized
tin.  Once carved, I covered the hair braids with texturing material to simulate a fur wrap.   As for the coloring, I'm thinking of using this dress as a guide:
I really like to darker colored cape.

While I had a number of Buffalo skulls aready carved the size of the figure required that I care one more.  I carved the arms and hands separate so they would fit naturally around the shape of the horn caps.  

While this was a pretty challenging project once it's finished it's going to really look nice.  I hope you agree and will look forward to your comments.  More photos in the Gallery. 

Thursday, July 14, 2016

Wandering Bull - Part 3

He's finished!!  Thank the Lord!  I thought I'd never get this one off the work table.  But, I think he turned out pretty good.  Certainly a colorful one.  I repainted the eyebrows black to try and recapture the stern look on his face that was lost when I painted on the red facial decorations.  It didn't work completely but it worked a little so will have to leave it at that.

So, I hope you like it and will look forward to your comments.

Friday, July 08, 2016

Wandering Bull - Part 2

Squeezed in a little brushwork today.  The photo looks a little distorted as I took it with my phone.  It's really not that crooked. 

One thing I've learned when painting facial decorations is that it can change or hide expressions.  That happened here.  Unpainted he looked really P.O.'d but here he looks kind of contemplative.   Will have to wait till the painting is completely done to see if there's any change and whether I can correct it.  

Really enjoyed doing the shield.  I painted the entire blank with raw sienna and followed that with some lighter tan to lighten up the center.  Next came the green, several coats, and then the red lines....mapped out using a Popsicle stick.  A liner brush really comes in handy when doing straight lines.  It took three coats to cover that green.  Then I free-handed the skull using tan, white and black.....lots of blending here.   The hooves were last done with asphaltum and outlined with black.  Oh....I also used midnight blue to put a shadow on the bottom of the shield and up the one side.  A lot of work but it's fun and the result will be quite striking once the feathers are added.  

So, it might not look like I did much but believe me it takes time to get the result your after.

Thursday, July 07, 2016

Wandering Bull

This one has been on my workbench for about 6 months staring at me each day so I thought I would go ahead and finish him cause he looks a little threatening.   I still have to add a few more details....actually, I have to add a lot of details to him to flesh him out, i.e., ribbons, feathers and maybe a decorative cloth (wood) strip hanging from the back of the headress plus all the feathers to be added to the shield.   Again, he's a little larger than the normal bust standing at just under 14" with the walnut base.  With the addition of some facial decoration he should be quite striking and colorful.

While we were on our trip we stopped at the Prairie Edge store in Rapid City, SD.  Like the Cowboy Hall of Fame in OKC I seems to be magnetically drawn to this place.  It's filled from floor to ceiling with Native American art and artifacts and if you like such things you owe it to yourself to make a stop if you're in the area.  They also sell the numerous craft supplies used to make regalia.  While there I took the opportunity to take photos and will refer to those to come up with the designs for this figures beading, shield design and other decoration.

With Judy and I celebrating our 50th next weekend I hope I can get it wrapped up before the hordes of visitors start showing up.  Anyway, I hope you like him and look forward to any comments.

Monday, June 27, 2016

Rendezvous Bound 2

Finally!   I thought I would never finish painting this guy but in the end it was worth the effort.  Really like all the bright colors and especially the feathers.  The only problem I can see is that there is so much color it's hard to focus on one area without being drawn to another!

This is a pretty large one, standing at just under 15" with the walnut base.  I originally had his eyes focused straight ahead but changed them to where he's looking slightly off center.  Doing such small changes can really end up having a large affect, just like tilting or turning the head or having a figure stand off to one side.  If you haven't tried these things you should as I think you will be surprised how much better it can make your carvings look.  There are way too many pieces out there where the carvings seem to be standing at attention.  Boring!

More photos in the gallery and I look forward to your comments.

Wednesday, June 22, 2016

Rendezvous Bound - Part 2

Spent yesterday afternoon painting the hat.  Instead of a single feather thought a group of them would look better and add a little pzazz to the piece.  The Turkey feather turned out so nice I'm thinking of changing the name of the piece.

The Blue feather is from a Blue Jay and the Red one from a Red Bird.  I highlighted the hard edges of the top hat to indicate a little wear.

 Here's another photo of the hat on the head, and no, he's not blind just not completely painted.  But it's looking good so far.  The colors of the face and beard are pretty flat and washed out due to their not being varnished.  They'll deepen once that final step is completed.

Hope you like it so far.  No more photos yet.

Saturday, June 18, 2016

Rendezvous Bound

I think we're having a Rendezvous down at the shop.  Mountain Men all over the place.   Here's the latest.  This one is pretty large compared to what I normally do....14" with the walnut base.  Still have to add the feathers to his top hat and then it's off to the paint table.  Should be a nice one when done.  This is the only photo.

Next up?  A Native American girl with a Elks tooth dress.  At least I hope thats what next.  Have the head done and have been doing a bunch of research to come up with a dress design.

Lots going on around here this summer so the Blog posts have been few and far between it seems.  Once I get that girl started I'll try to take you along for the ride.  Till then stay cool.


Sunday, June 12, 2016

The Booshway

Here's one that's been on the workbench and paint table for quite a while.  With springtime chores and a planned trip to Jackson, WY, Yellowstone, the Tetons and the Little Big Horn battlefield taking precedence, finding time to do some whittling has been difficult.    We had time to take in the Mountain Man museum in Pinedale, WY which is highly recommended if you're in the area.  Also, Jackson, WY, and the fantastic galleries there is worth a couple days to soak up the current western art scene.  Jackson is such a great little town.  Besides the galleries the history of the place, the restaurants, bars, the city square are just great.  And this trip was really special as Judy gave me a fantastic pre-birthday present of a Dave McGary bronze.    It's titled "Wyoming" and is made up of a buffalo skull, warbonnet, moccasins, pipe bag, a pair of beaded gloves, asix gun and holster, and spurs.  About the only thing missing is the Tetons and Old Faithful.  Beautiful.


Well Google has gone and deep-sixed Picasa so the additional photos of the carving are not on Google +.  And don't ask me how that works as I haven't figured it out yet.  The title of the piece "The Booshway" is a corruption of the word "Bourgeois" which was the word used to signify the company men who were generally in charge of the free-trappers.  This fella looks like he's been around a while.

Anyway, hope you like him and your comments are always appreciated.


Sunday, May 15, 2016

Seasons Past - Finished

I put the final finish to this one early this morning.  I think he turned out really nice....one of my best efforts.  As I mentioned earlier, I duplicated the shield design from a photo I had in my reference files and captured it as well as I could.  Setting here looking at it I think I will add just a bit of dry-brushed white to the fur on the top of the shield to bring out the texturet more.  With the walnut base it stands just at 12" tall.  Someone is going to get a really nice carving.

There are more photos in the Gallery and I will look forward to your comments as I always do.  

Saturday, May 14, 2016

Native American Shield

I used the reference photo to make the shield for my new piece. I think I captured it pretty good. Sure is fun to do these things which is why I enjoy this craft so much.  Should have the figure done tomorrow.

Thursday, May 12, 2016

Bright Star

I finished this one yesterday.  Thought I might get the nameplate in time for the photo but it didn't show.  Lots of beading on her and also added beaded leggins for this one to add a little more interest.  I think she turned out pretty nice.   More photos in the Gallery.  Hope you like her. 

Seasons Past

Here's a new one I just finished up today.  I still have to add three feathers to the shield and then I can begin painting.  This should really be a colorful piece.  I used the same technique I have been using on braids to simulate fur on the top of the shield.  Will be interesting to see how it works out. He will also have earrings but I forgot to put them on for the photo.  With the walnut base it stands about 12" tall.

Hope you like him.  

Monday, May 09, 2016

Now The Fun Begins

I've been researching beading patterns to use on this piece and think I've found a few that I like for the moccasins and the leggings.  Still haven't decided on what to use for the chest and shoulders.   

Monday, May 02, 2016

Carving a Cowboy With Angora Chaps - Part 29

Cowboy With Angora Chaps Part 29 from Out West Woodcarving Videos on Vimeo.

Here is the last part of this series.  I hope you enjoyed following us along in creating him.  There are a number of photos in the Gallery and I will look forward to your comments.


Thursday, April 28, 2016

Carving a Cowboy With Angora Chaps - Part 27

Finally, after three attempts, I was able to get this segment up and on the Blog.  Some days it's a battle.  But as Chief Dan George said...I "Endeavor to Persevere"!

Cowboy With Angora Chaps Part 27 from Out West Woodcarving Videos on Vimeo.

Monday, April 18, 2016

Carving a Cowboy With Angora Chaps - Part 19


Cowboy With Angora Chaps Part 19 from Out West Woodcarving Videos on Vimeo.

Montana Pete

Here's a new one.  "Montana Pete"!  He stands almost 14" tall with the base.  You can tell he's from Montana by the at he wears....a Montana Peak style of crown.   This shows up better in the side view pics. There are more photos in the Gallery and I look forward to your comments.

Thursday, March 31, 2016

Carving a Cowboy With Angora Chaps - Part 10

Who would of thought how easy it was to do it with my phone. Problem solved.


Cowboy With Angora Chaps - Part 10 from Out West Woodcarving Videos on Vimeo.

Carving a Cowboy With Angora Chaps - Part 9 - Bad Day at Black Rock

For some reason, getting ready to film the next segment of this series, our video camera went on the fritz and will not accept a memory card.  So, to get around the problem we are temporarily falling back to my Nikon 5200.  Things might be a little shaky for a while so we hope you will stick with us till we get back to normal.  In the meantime, here's a short video using the Nikon.


Cowboy With Angora Chaps Part 9 from Out West Woodcarving Videos on Vimeo.

Wednesday, March 30, 2016

Carving A Cowboy With Angora Chaps - Part 7

I'm not sure what caused the loss of audio when I uploaded Part 7 yesterday.  Whatever, I've reprocessed it and it now seems okay.  Here's the new one.


Carving a Cowboy With Angora Chaps - Part 7 from Out West Woodcarving Videos on Vimeo.

Saturday, March 19, 2016

Carving a Cowboy With Angora Chaps - Part 2


Cowboy With Angora Chaps Part 2 from Out West Woodcarving Videos on Vimeo.

Carving a Cowboy With Angora Chaps - Part 1

With this video series I thought we'd just start from the beginning again and go over every thing we might have learned since we began with the first one a few years back.  Hopefully, a lot has been learned since then so the end result should be an improvement.  Let's get started!

Here are a couple of links to things that might help:


Timber Wolf Bandsaw Blades:  http://timberwolfblades.com/proddetail.php?prod=31604PC


Heineke Wood Products: http://www.heineckewood.com/


Cowboy With Angora Chaps - Part 1 from Out West Woodcarving Videos on Vimeo.

Tuesday, March 15, 2016

Endeavor to Persevere


Okay....I'll say it!   WOW!   I really like this piece.  I had my doubts as I painted him but once I added the facial decoration it all seemed to come together.  I really like the eyes as they just seem to say so much.  Sort of "Look!  I'm here and I'm not going anywhere!"  As for the title if you've seen the movie "The Outlaw Joesy Wales" you will remember Chief Dan George saying those words..."Endeavor to Persevere!"  I think that's a great statement and it applies to this piece. 

There are more photos in the Gallery and I'll look forward to your comments. 

Monday, March 07, 2016

Native American with Robe

I managed to get the braids completed and I also redid the butt end of the rifle as it was ok in length but not to scale in the butt area.  Looks a lot better now.  I added a neck scarf with a pendant so the piece is pretty well done except for the feathers which I hope to do tomorrow.  Hope you like it so far.

Saturday, March 05, 2016

Native American with Robe

I didn't get the braids done but I did manage to texture the robe, reduce the size of the nose and get the rifle case done.  I decided to do the case as it will contrast well against the dark robe and also allow some beading.  Also, I tried something new using some aluminum flashing to make tassels for the end of the case.  Once they are painted I will bend them to add a little more motion.  Might also add some kind of hanging detail on the butt end.  To me the rifle looks small but a Yellow Boy carbine measured 40" in length so it's in scale with the figure....at least I think it is.

To make the texture on the robe I used my old method of stoning it with a dremel bit and then torching the rough surface with a butane torch to remove the fuze.  Then a brushing with a small brass brush to finish up.  This method is much quicker than burning the entire areas with a pen and it gives a pretty good effect.

So, maybe tomorrow I can get those braids on and then come up with some kind of detail for the chest.

Friday, March 04, 2016

Native American with Robe

About wore myself out today doing this one.  Cut the blank out from a 4 inch piece of basswood I bought back in the 90's  and I think it was in the process of becoming petrified as it sure was hard.  This one is 15 inches tall with the walnut base and it might grow a bit more once the feathers are added.  He's going to be holding something......probably a rifle if it works out the way I hope.  We'll see tomorrow.  Hopefully, I will also have time to add the braids.

I'm thinking of trying something different with the robe this time.  Instead of having the fur turned out at the top I'm going to try and have the skin side exposed with the fur on the lower part.  That way I can do a little designing on the hide.  At least that's the plan.

Anyway, I hope you like it so far.

Thursday, March 03, 2016

Making a Flintlock Pistol - Part 4

Somehow we lost the very beginning of the video.  You see just a flicker of me painting the piece Burnt Umber.  So, if you do it like I did paint the entire pistol Burnt Umber...probably take a couple of coats after it's been primed with Self-Etching Primer.  Hope that's clear.  Here's the rest of the painting....

Making a Flintlock Pistol - Part 4 from Out West Woodcarving Videos on Vimeo.

Sunday, February 14, 2016

Rendezvous Bound

Here's the last one I managed to finish before next weekend's Charlotte, NC Woodcarving show.  It's a little more realistic than my usual fare but that seems to be the direction I'm heading now.  Stands about 12" with the oak base.  Hope you like him.  No photos in the Gallery on this one.

Friday, January 29, 2016

Touch the Stars

I think this is another example of my best work.  Maybe that cataract operation paid off after all.  Whatever, I really like this one.  As I've mentioned before, I've been trying to be a little more realistic with some of my pieces.  The treatment of the eyes on this one accomplished that nicely.    I decided to keep the facial decoration to a minimum and the two white lines were just enough to give a fierce appearance while not obscuring the subjects features.

The shield design is partially from one I found while researching on the web but I modified it quite a bit from the original.  Instead of domed tacks, this time I use some very small brass bells.  Such things were actual trade items Native Americans sought for decoration.  

There are more photos in the Gallery and I will look forward to your comments as I always do.


Making Earrings - Part 2

Making Earrings - Part 2.0 from Out West Woodcarving Videos on Vimeo.

Making Earrings - Part 1

Making Earrings - Part 1 from Out West Woodcarving Videos on Vimeo.

Tuesday, January 26, 2016

Native American with Shield

Here is a new one I'm in the process of doing.  The shield will be fleshed out quite a bit more before it's finished.  Also it's a bit more realistic in the facial features.  I've lessened the size of the eyes which should look pretty good once the color is added....at least I hope so.  Anyway, we'll see how it turns out once it's painted.

Wednesday, January 20, 2016

Many Horses

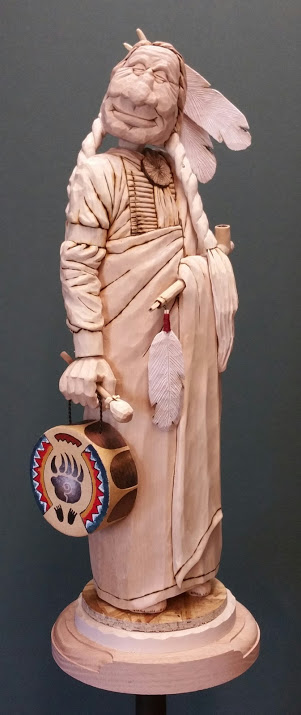
After doing the head of this piece I had named it "Iron Jaw" for an obvious reason but as things progressed the shape of the head changed as did that jaw.  Finally, coming up with the design for the shield that name just didn't fit anymore so "Many Horses" seemed like an excellent choice.

With that shield and the hanging feathers this piece stands a little over "14 inches with the base.  Nice!  I've mentioned before that working in a larger scale not only gives you the chance to concentrate on details but it elevates your work to a higher level.  

As I seem to be moving toward the more realistic figure, one area needs to be addressed and that is the eyes.  On this figure I think they are a little large which is why I decided to do the facial painting as a solid black strip to reduce their appearance.  That pretty well corrected their size.  Yesterday afternoon I worked on a new head, reducing the size of the eyes and it really changed the whole appearance of the piece which was exactly what I was looking for. 

The beading design is my own and the feathers hanging from the shield are based on those of a Red Tailed Hawk.  The head feathers are large and out of scale but they balance the piece...the off-set shield pulls the eye one way but the feathers pull them back to the center.  The base is walnut and I'm trying a new routed edge to accommodate the name plate.  

There are more photos in the Gallery and I'll look forward to your comments.


Sunday, January 10, 2016

Jedediah

Now this fella could no doubt tell you some really interesting stories.  I picked the name Jedediah as that has always been a favorite of mine since I read a book about Jedediah Strong Smith many years ago. If ever there was a Mountain man old Jed was him.   Of all the characters of the old west he would be the one I would choose to set down with and listen.

This is about 12" tall with the base.  A really nice size.  There are more photos of him in the Gallery and, as always, I will look forward to your comments.

Muley

This one is rather dark due to the hat brim but that sort of adds to the mystique of what this fella is about.  Now, what he is about I have no real idea but with the name of Muley I can imagine all sorts of things.  I'll just leave it up to your imagination.

There are a few more photos in the Gallery and, as always, your comments are appreciated.


Tuesday, January 05, 2016

Wichita - Finished

Put the finishing color to this one yesterday and he turned out just great.  Especially, as his head had been collecting dust for the past couple of years.  I guess it proves the adage that you shouldn't rush into somethings.

With the base this one stands as 12" so it's makes a nice presentation.  I gave him a worn looking plaid shirt along with a faded neckerchief.  I even gave him a few freckles which you can see more clearly on a closeup in the Gallery.  If you want to know what Wichita actually sounds like here's  the link back to 1958 and the "Luke Slaughter of Tombstone" radio show. Luck Slaughter Radio Show

I think my presentation matches the voice just right.

There are a few more photos in the Gallery and I look forward to your comments.