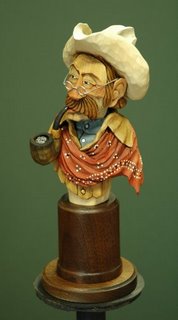
A number of you have asked me to explain how I put a hat on a Cowboy. Well, this post should answer all your questions.
First, let me explain why I do it this way. When doing a figure or bust the grain of the wood almost always runs vertically. This is great for the body and the head. Unfortunately, for the hat it presents a problem. The brim of a hat is very thin and this vertical grain will make it extremely fragile. It also prevents you from getting a real "razors" edge appearance that really looks great on a piece. Through a lot of experimenting I've come up with a solution which, for me anyway, works out perfect.
Now some of you might consider this cheating. However, I think after you review my process you'll see that doing it my way involves a lot more effort than doing it in what's considered the normal way. It gives me the effect I'm after so I'm sticking with it. Besides, a lot of people don't consider me normal anyway!

Thanks Myron. I hope you have luck with this technique. Keep me posted when you try it out. One thing I didn't mention was to keep the area where the head and the crown will meet thick until you get the head seated. After that you can judge how much to take off by looking inside the dowel hole. Don't want you to carve through the brim.
ReplyDeleteLynn, the pattern for the brim, do cut it in half along the center line that you have drawn and have two brims? also does the dowel go thru the crown, brim and into the head?
ReplyDeleteSkidi77...yes! I laid out two hat profiles to save wood. And yes again about the dowel. Cut it long enough so that it will go through and into all three. Also, I wait until the head and hat are painted before glueing them together. Works better that way.
ReplyDeleteLynn, thanks for another very well done tutorial. I plan to give it a try as soon as I finsh the boots I'm working on now.
ReplyDelete