
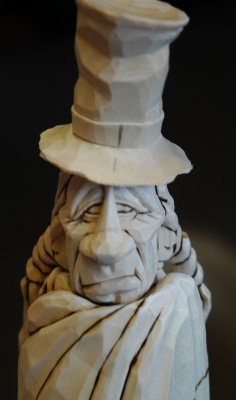
Now that we have the Body of the figure almost completed we can begin on the head and hat. Notice I said the body was "almost" completed. We still have to match it to the head! Remember that it's cold out there so we want his head pulled down into the blanket. To do that will take some extra fitting.
There are a ton of photos associated with this post as I wanted to really go over a number of steps which, I think, really make a good character. Even though we're carving a caricature, facial structure is just as important as when carving a realistic figure. There has to be bone struction to support the features and I'll explain and show this as we move through this lesson.
One important thing about this carving....As he is cold and sad we want the weight of the snow and his other worries to really bear down on him. To show this all lines on the face will curve downward, i.e., the eyebrows, the eyes, the mouth. Even the brim of the hat and the direction of the hat's tip amplify this mood.
As indicated on the original drawing the braids and hat are done seperately as are the feather and the two little ear rings. The braids will be epoxied in place and then carved. The feather and ear pendants will be carved and then glued in place once the figure is painted.
So, we've got lots of ground to cover so we'd better get started!!
This is a good one Lynn..it will be awhile, other obligations, but I am definitely going to do this one! Thanks :)
ReplyDeleteLynn,
ReplyDeleteThis is a great project and I like looking at all the projects on the site. Question, did you carve the entire head using "old reliable"?
Terry....While Old Reliable is by far my favorite tool, I do use other knives if needed. However, as for doing very fine detail you can't beat the thin blade and sharp edge that it provides.
ReplyDeleteHi Lynn, once again I'm absolutely astounded what you can do with such simple tools and you're ability to put together such a great step-by-step is greatly appreciated!
ReplyDeleteThe wood burning tool seems to be another of your favorite tools, in addition to old reliable, it certainly does enhance the overall appearance of the carving. It's on my wish list -
Your photos always turn out well and I assume you are using digital? What camera are you using?
Again, love your work and the blog. Please don't stop sharing you're expertise.
Ron....I use a Nikon D70. You're right...it takes great pictures. Thanks for your interest in my work and blog.
ReplyDeleteLynn,
ReplyDeleteI am thinking about getting me an "old reliable" to try and wanted to know...Do you sharpen or just replace the blade when needed?
Terry...No, I don't bother as the replacements are so cheap it's not worth it. Besides, I don't think they would resharpen that well.
ReplyDeleteWhen you buy one make sure you get the kind the DOES NOT retract the blade. Also, a metal handle vs the plastic ones. I know Lowes sells the one I use. They usually come with a couple of blades stored in the handle. Take those out cause they get dull rattling around in there. You can buy a 5-blade pack that, when you consider you'll use both ends, will last quite a while.
To shape them up for carving I just strope them to get off the factory burr. If you protect the blade it will last quite a while. When it gets a nick or gets dull just turn the blade around and start over again!!
Lynn, this is great, thanks for carving another Indian. If you don't mind I have a few questions for you. How thick are the blanks for the head and the body? We didn't get a look at the ear pendant placement. What about carving the nose, one minute there is a "outline" of a nose and the next picture shows a completed nose. I looked back on the Cook carving and the same thing, how about carving us a nose? I don't know if I have the courage to slice the top of my head off to do the hat, just to think about putting the time in to get to that point and to do that, I don't know!!! Thanks again for sharing your talents with us.
ReplyDeleteDeb
Deb.....Sorry about the lack of Nose detail. I'll make a post on that. As far as cutting off the top of the head just do it a little at a time to make sure you're going in the right direction. I take off the top then use my disc sander to smooth it down the rest of the way.
ReplyDeleteLynn, I just wanted you to know that I went and got my own "old faithful" to try out. You know they just don't make things like they use to, mine doesn't carve near as good as yours, oh well!
ReplyDeleteDeb
Good articles, Have you heard of Mr Benjamin, Email: 247officedept@gmail.com --WhatsApp Contact:+1-9893943740-- who work with funding service they grant me loan of $95,000.00 to launch my business and I have been paying them annually for two years now and I still have 2 years left although I enjoy working with them because they are genuine Loan lender who can give you any kind of loan.
ReplyDelete