Wednesday, June 28, 2006

Indians!


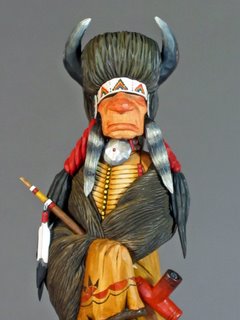
I'm a little busy at the moment getting ready for the Eastern Oklahoma Woodcarving Show in Tulsa on July 7 and 8 so I thought I'd post some photos of Native Americans I've done over the years. For some reason, caricature woodcarvers seem to ignore this genre of figures. Maybe they're afraid of being not quite political correct. I note that you don't see too many caricature carvings of African-Americans either. Too bad. Both the Native American and the African American are rich in detail and theme.

One thing I think you'll note about my carvings of the Native American or any other class of character is that I don't make fun of them. Sure, I'll do them in a caricature style but, as I've always thought and said, you can still show a proper amount of respect toward the figure and still be amusing. A lot of carvers use a 'Mad Magazine" approach to carving, showing their figures in poses and scenes that can be in poor taste and sometimes downright disgusting. I've never seen the fun in doing that.

Anyway, here are a few Indians I've enjoyed doing over the years. I proud to say that almost everyone of them has left the reservation.

Sunday, June 18, 2006

Cowboy Boots ....Making the Mount


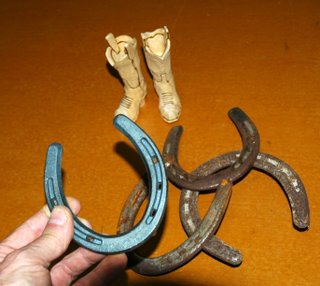
Just a few more steps to go and the Boot project will be complete. First we have to decide on a horseshoe to use. My horse Boomer was kind enough to give me one of his old ones so I will clean it up and use it. A new one will work just as well but make sure you get the proper size..."OO Lite". If you go to the Farm Store to pick one up you'll probably find three sizes: "OOO, OO and O". I'm holding a "OOO" which is normally used for Ponies. These would work great for a smaller carving. You'll need 8 horseshoe nails and they come in boxes of 100. Worse yet, they're not cheap! Maybe you can split the costs with some carving buddies!

Whichever shoe you decide on, old or new, give it a good sanding. If it's an old one clean out the holes and sand off any rust. Make sure it sets level and is not bent to an odd shape. Those Farriers really have to twist and pull to get some of those shoes off the horse.

In the photos attached to this post I explain what stains and finish I use for the wooden mounts and how to put everything together. If you want to put a Nameplate on your finished carving you can get a nice one really fast from www.signsbygwynn.com.

This project has gone pretty quick and, hopefully you now have a piece that you'll be proud to set on your desk or shelf or to pass on to a little Buckaroo you might know. For our next effort we'll try a Saddle and also use the Horseshoe as a base.

Stay tuned!

Thursday, June 15, 2006

Cowboy Boots....Finishing Up The Carving!


With this post we finish up the carving part of this project. Lots of photos to help you along. We're going to be following a lot of pencil lines with our knife blade. When you do this try and remember this basic rule in woodcarving: If at all possible, never cut straight into the surface of your carving. Just by giving a slight angle to you cut you will lessen the risk of edges breaking off or crumbling. Also, with lots of practice, you should try and make a cut a 'one time only' affair. Having to go back and redo a cut previously made will almost always weaken that area and leave you with a sloppy looking carving. Try and develop the skills of a Chip Carver who only makes the cut one time.

So, take your time and have fun!

To be continued......

Cowboy Boots....Roughing Them Out!


There are a lot of photos associated with this post to show you just about every cut I made on that boot blank to the left. Except for cleaning out the shaft hole, I did this entire carving with just my box knife. So, when someone brags about their $45.00 carving tool, maybe you can tell them about your $1.75 wizard!

Make sure you wear a glove and thumb protector when doing this project. You'll see me switch to a new thumb guard about half way through. Protective tape is cheap compared to the pain and downtime of a bad cut so if they start to get a little thin ... out they go! Also, note the frayed ends of my gloves fingers. Imagine what my digits would look like if I forgot to slip the glove on! OUCH!!!!

So, let's get started!

To be continued.........

Monday, June 12, 2006

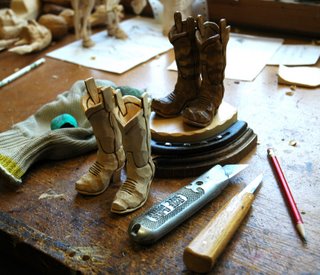
Cowboy Boots - Carving A Pair!


I'm going to try and keep this project as simple as possible so that a carver just starting out won't be too intimidated. We'll try and use as few tools as possible and will not be applying any paint, only stain. Once the boots are finished we will mount them on a fairly unique base.

My main tool for will be Old Reliable backed up by a carving knife with a curved blade. The curved blade will allow me to reach inside the shaft of the boot to clean it out. Other than that I could accomplish everything with the box knife.

I cut the blanks out of a 3" thick piece of Basswood. Once the profile has been cut the blank is cut down the middle giving me the two boots. Ideally, each boot blank should be at least 1-1/4" thick. The piece of Basswood the Boots set on is 1/4" thick and the Oak base is 3/4" to 1" thick.

I talked my horse Boomer into giving me one of his old shoes to use. When you go looking for a shoe make sure you get a Lite 'OO' size. Generally, shoes come in O, OO, and OOO. The Lite is a lighter weight shoe . Get you some Small horseshoe nails too. Regular nails would look kind of funny.

So, the pattern is listed in the additional photos as are a few beginning tips. So let's get started!

To be continued.....