Saturday, March 28, 2009

Carving A Steer - Part 2- A Nice Piece of Tail!

I just knew that title would get your attention! So lets get started with Part 2 of this project!
-
In this post we'll finish the main body, glue it up and come up with that piece of tail. One thing I've learned about carving my way is that you never throw anything away that could possibly be of use later on. Sure, you can find most if the stuff you might need at a lumber yard or a hardware store...but not always! An example of this is that piece of metal wire I used for the tail. It came from the reel off a spent roll of fence wire. I had no idea of what I would use it for but it was just too good to toss out so I put it in the drawer where I keep old coat hangers, brazing rods, sheet copper and tin just in case.
-
When carving the body of a bovine it's important to get the boney structure of the hip area. It doesn't have to be spot-on but it does have to be there or it just won't look right. I've included some anatomy photos in the gallery to help you see these areas. All the photos for this second part are located in the same album as the first part.
-
In the next post we'll start on the head and the horns.

Wednesday, March 25, 2009

Repost - Making Paper Manikins

I'm reposting this one from a couple of years ago as I have received a few questions about patterns for various figures. I have gone back and retrived the associated photos and placed them in the new Gallery for reference. You can find the old post by going up to the search window and typing in "Making Paper Manikins". I use these little figures on an almost constant basis when coming up with figures. I just lay them down on a piece of paper and trace around them, adding any modifications if necessary. A front view is normally not necessary as this profile really doesn't change much. When I get the block to the bandsaw I also try to allow some extra wood to take a thin slab off of the side profile so I have a hard pattern for future use. Over time I've built up a supply of patterns for just about any post I might need.
-

Sunday, March 22, 2009

Kansas City Gold!!

The Kansas City Woodcarving at the John Knox Center in Lee's Summit proved to be a great sucess. As you can see by the photo we were lucky enough to bring home some of the available loot. Here's a list of just what won what:
-
The General- 1st Caricature Bust
Leprechan- 2nd Caricature Bust
Texas Skip- 1st Caricature Single Figure
Tequila Sunrise -1st Caricature Scene
No Swimming- 1st Caricature Group, 3rd Best of Show
-
To cap off the event we even managed to win the Best Display ribbon. The only downside was our entering Johnny Reb into the wrong category which resulted in him being completely passed over. Oh well, we certainly can't complain and there are always other shows where he can try his luck.
-
While I'm here I'll mention that we finally were able to capture all the photos from the previous Gallery so I'm in the process of uploading them to the new one. These albums will appear at the end of the Picasa album list. Unfortunately, all the descriptive captions were lost in the process. But not to worry, over time I'm sure we'll cover anything lost as I complete new carvings, at least I hope so.
-
So, give me a day to unpack, pick the accumulated ticks off the horses and I'll get back to that Steer project.

Thursday, March 19, 2009

Tea Time- 2

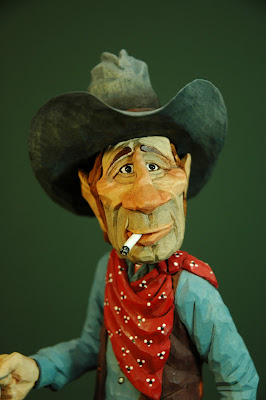
Old Crusty got his makeup on yesterday so he's all ready for his trip to Kansas City cause he's heard that "everything is up to date"* there and he's a guy who want to be au courant with whats happening! Hopefully, he'll do some networking and get hired on at another spread. One thing for sure....with that "Equalizer" strapped on to his leg any ribbing about his choice of cup contents has suddenly came to a complete halt.
-
This was a pretty quick project and the kind I think I'll do more of. Big involved scenes are challenging but they don't sell very well. There's not too many collectors out there who can devote a complete table or desktop to a piece but they can find room to display a single figure.
-
Anyway, I hope you like him and look forward to your comments. More photos in the gallery.
-
(*Apologies to Rogers & Hammerstein!)

Extra Note: Under the Gallery link I've posted a link to my Facebook page. There's not much carving going on there just my frequent postings of jokes, cartoons, photos and other stuff. Also, as it seems the older I get the more conservative I become so those who lean more to the liberal side might not enjoy the visit. Living out here in the boondocks I'm always on the lookout for new "friends" and Facebook seems to be a means to hook up with some.

Wednesday, March 18, 2009

Tea Time!

Tea Time? You've got to be kidding me! No self-respecting Cowboy worth his salt would brew up a cuppa Orange Pekoe without running the risk of having his bedroll short-sheeted and while he's not looking a burr carefully placed under his saddle blanket. However, here in the make-believe world of the Out West Ranch just about anything goes so old Crusty there can enjoy his aromatic beverage without worry about being bucked across the east section.
-
About the only thing new on this figure is the teapot. I carved the spout seperate and attached it with a small wooden dowel as I knew it would break off if I didn't do that. I drilled a couple of holes on each side and inserted 1/8" dowel for the wire bail. Sticking the wire directly into the pot without that wouldn't be very strong. To finish it off I drilled a hole in the lid and inserted a decorative nail for the handle. The cup is made from tin and the tea-bag tab is a piece of wire with a metal tag soldered on. It's held in place by the epoxy I filled the cup with to simulate Tea. Crusty's cigarello is made from a piece of coathanger wire. Some might use a piece of wood but with the wire I know that it will never break.
-
There are more photos in the Gallery and comments welcome as always.
-

Sunday, March 15, 2009

Carving A Steer

With this new project I hope to cover a lot of requests that I've received since starting this Blog. First, we'll do a steer and then a Cowboy on a horse to go with it. It should make a neat looking scene with lots of color and loads of detail.
-
In the Gallery I've posted a number of photos outlining the steps of getting the legs and lower body roughed out. I used some of Dale Heineke's terrific Basswood which really makes carving a pleasure. In the next part we'll finish the legs, glue the body together and finish it to the point of attaching the head.
-
Comments and questions are welcome.

Stretching His Rope - Part 5 - Finished!!!


Yipee!!! Hooray!!!! Whoop-di-do!!! I finally finished this project!!!!!!!!! I guess you can tell that I'm happy to get him off my work and paint tables and into the Gallery. Just in time for the Kansas City Show. And, if I don't sell him there, I'm thinking of putting him up for auction.
-
I've covered painting before so let me explain how I did the rope. I went to Lowes and bought a coil of pre-twisted galvanized wire which uses 4 strands of, I think, 20 gauge wire. I cut a length of it to match about 30 feet in scale with the figure as that's how long a lasso would be...about 36 inches. I removed two of the wires and chucked one end into my drill and the other clamped in a vise. Running the drill in reverse as forward would untwist it, I ran the drill until it looked like rope. Next I coiled it around a 2 inch cylinder and then dropped it into a plastic cup filled with enough gun bluing to cover. Once it darked up I removed it and set it aside to dry completely. Once dry a lot of the oxidation comes off on your fingers so to stop this from happening I give it a spray with Deft to anchor it down cause I don't want it to dirty up my carving while I'm threading it through the hands. To complete this step I bend and tie a honda on one end using some thread and a drop of superglue.
-
Now comes the fun part.....Before proceeding stop and figure out just how that rope would go through his hands. The best way to do this is to get a length of rope, make a loop and assume the pose you want. Ask for help from the wife or someone for this step cause the last thing you want to do is to thread that rope only to find that you did it wrong. Those hands are fragile!!
-
Now, assuming your Cowboy is right-handed insert the rope into the hand so the honda hangs out the front. Loop the rope around, up through the honda and back into and through the hand. Then its over his leg and into the hand from the front continuing to make the loops until all your rope is used. You can click on the photo above to get a real closeup of how I coiled his rope. Now that rope is going to be pretty springy so you're going to have to be very careful bending it as you go. Once you get it just like you want it use a few clothes pins to hold it all together while you mix up a little epoxy to hold all those loops together and in position. Don't worry about the right hand, that loop will hold without any glue.
-
Now it's time for some paint. Using a color called Mudstone lightly dry-brush the rope until you get the color coverage you want. Ideally you want the dark crevices to remain dark with just the top of the rope colored. I get some paint on my brush then brush most of it off on a piece of paper before applying it to the rope. Takes a few times to get everything covered but it's not that hard to do if you take your time.
-
Now you can anchor him in place on his base and check for final touch-ups and your through. I'll bet you will fill just like I did....Thank God that's over!!!
-
More photos in the Gallery and comments welcome as usual.


Hard Times

I might have uploaded these photos before but here they are again just in case I didn't.
-
This little Convict is hoping he's pounding his way to an early parole but I have a feeling he's never going to break free of his bonds. Sad, cause he's such a neat little guy. The scene is a small one, standing only about 10" tall with base.
-
The rock he's perched on is actually a piece I picked up from that large meteor crater in Arizona. I anchored it into a large glob of Bondo auto-body putty and then added some smaller gravel pieces around it. Once dry I painted it dark grey and then drybrushed on some white to give it texture. I think it worked pretty good to convey a pile of rocks.
-
The ball and chain are held to the leg by a metal band. The chain came from some necklace jewelry I picked up at WalMart. The ball is just a piece of whittled wood.
-
There are a few more photos in the Gallery and comments are always welcome.

Saturday, March 14, 2009

Frowning Cowboy Bust - Repost


Here's a repost of the Frowning Cowboy Bust tutorial I did earlier using the old Gallery format. All the photos from the original post are now in the Picasa Gallery.

Thursday, March 05, 2009

Off Season Santa

Christmas is over, the sleighs been moved to storage, the reindeer fed, the Elves have all left for sunnier climes and the old lady is down at the spa so it's a chance for the old boy to kick back and finally enjoy a few moments of quality time at his favorite internet betting site.
-
While this figure is a little out of character for me it was fun doing a popular figure in a theme not normally associated with him. In doing this piece I muted all the colors to get away from the normal cheery & clean look. I had a little extra fun with his t-shirt which you can check out in the gallery. Unfortunately, once the head was glued in place that detail is hardly visible but the Pizza sauce stain remains. Also, not evident in the photos is the TV remote stuck in his robe pocket just under the Racing Forum spreadsheet. I made the six-pack by locking a thin piece of tin between two pieces of plywood prior to drilling the holes for the cans. That way I got good, clean openings. The cans were carved from dowel and I left a lip at the top of each can so it would set in place as the real ones do.
-
The Racing Form sheet was taken from the web and reduced to size. I then used an fine ink pen to indicate type and a couple of photos. The eyeglasses were made from wire, soldered and then locked in place by drilling a couple holes into the head.
-
They told me that once I carved a Santa I would be hooked on them and maybe they're right as I have a great idea for doing another. However, for the moment it's back to Cowboys!!

More photos in the gallery and your comments are always appreciated.