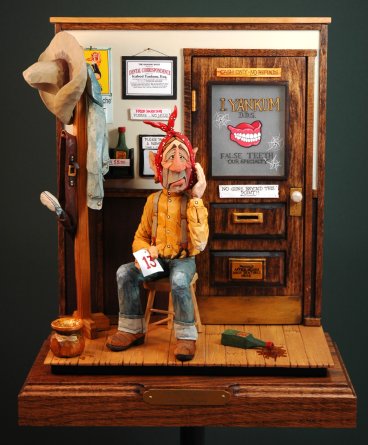
This is my Single Figure Caricature competition piece for 2007, at least until it's sold. Had hoped to show it at the Mesa, Arizona show in February but Mother Nature had different plans.
I spent a lot of time on the details. The glass window in the door is a piece of Lexan that I buffed to make it milky. The bullet holes were drilled and then white paint was used to create the spider-web effect of the bullets impact. A neat trick I'll use again. I created the Diploma on the computer and did the same with the calender. If you really strain your eyes you can read everything on the Diploma. All the other signs were made from thin strips of wood, carved and hand-lettered.
To make the coat stand I used my own gun and holster hanging on a peg as a model, the same with the jacket. When doing things like this you just can't beat working from the actual article. The spilt Pain Killer was made from drops of epoxy painted with Amber Shellac and then coated with epoxy again. Makes the liquid look real thick and gooey which is just want I wanted.
I did the figure first and then built the floor, wall and base. The chair is all pegged together just like a real one. Four pegs in the feet hold the chair and figure to the floor. The figure is pegged to the chair.
It takes a lot of planning to do something like this but once the "room" is built the little details just seem to start showing up. You have to be careful though as too many details will cause the scene to collaspe in on itself to the point that the original concept will be weakened.
Anyway, I hope you enjoy it. Drop me a comment below and let me know what you think.
More photos after the jump to the Gallery.