Wednesday, December 27, 2006

Let's Carve This Fella.....Part 2 - The Head & Hat!


Now that we have the Body of the figure almost completed we can begin on the head and hat. Notice I said the body was "almost" completed. We still have to match it to the head! Remember that it's cold out there so we want his head pulled down into the blanket. To do that will take some extra fitting.

There are a ton of photos associated with this post as I wanted to really go over a number of steps which, I think, really make a good character. Even though we're carving a caricature, facial structure is just as important as when carving a realistic figure. There has to be bone struction to support the features and I'll explain and show this as we move through this lesson.

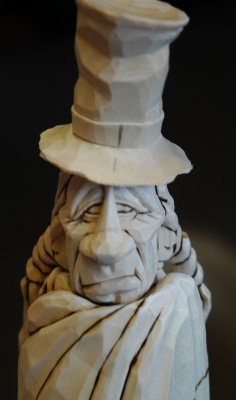
One important thing about this carving....As he is cold and sad we want the weight of the snow and his other worries to really bear down on him. To show this all lines on the face will curve downward, i.e., the eyebrows, the eyes, the mouth. Even the brim of the hat and the direction of the hat's tip amplify this mood.

As indicated on the original drawing the braids and hat are done seperately as are the feather and the two little ear rings. The braids will be epoxied in place and then carved. The feather and ear pendants will be carved and then glued in place once the figure is painted.

So, we've got lots of ground to cover so we'd better get started!!

Friday, December 01, 2006

Hey! Let's Carve This Fella and Make Some Snow!


As several carvers have ask me to do a post on carving this character I thought I'd just do the whole thing all over again from the beginning so you can follow along and make one of your own.

First, let's see just what the action is with this poor fella standing out in the reservation snow. It's pretty cold outside so he has wrapped himself up in his Government issued blanket. His right arm comes up across his chest and holds the blanket on his left shoulder. You can see his beaded mocs and the top hat he was fortunate enough to trade for. He's added a beaded strip and an eagle feather to spruce it up a bit. Still, as this months beef issue is late as usual he's not to happy about facing the wife once he gets back to the Tipi and she finds out that it's fry-bread for dinner and nothing else. Poor fella!

I've purposely kept this figure as simple as possible as I wanted to concentrate on the painting and snow techniques. We'll do the top hat and braids separately to make it even easier. Doing the braids separate will let us keep them down tight against the blanket so they look natural. I've drawn out the front profile only as I think you can figure out the side by yourself. The body without the head is 8" tall and 3" wide. You can resize it if you want but this size makes a nice little presentation.

As I've done this character already don't be surprised if this one will be a little different. That's okay! Even I don't like copying my own work! A little change here and there will make the new one unique from the old and that's always a good thing to strive for. Also, I've figured out a better and much easier way to make the snow base. So, let's get started.